Introduction
In a world where desserts often require refrigeration to maintain their freshness, it’s both refreshing and practical to discover sweet treats that can be enjoyed at room temperature. Whether you’re hosting a gathering or simply looking for a delightful indulgence for yourself, these no-refrigeration desserts offer a convenient solution without sacrificing flavor or texture. Among these delightful creations, we will explore a rich, chocolatey square that is not only easy to make but also perfect for sharing with family and friends. With a combination of simple yet tantalizing ingredients, this dessert promises to satisfy any sweet tooth while eliminating the hassle of cold storage.
As we dive into the world of no-refrigeration desserts, we’ll uncover the benefits of these delectable options and why they are ideal for various occasions. From potlucks to picnics, these treats maintain their deliciousness even when left out on the table. Join us as we explore the key ingredients that come together to create this sinfully sweet square and guide you through the initial steps of crafting your very own masterpiece.
Understanding No-Refrigeration Desserts
Defining No-Refrigeration Desserts
No-refrigeration desserts refer to sweet treats that can be safely stored and enjoyed at room temperature. Unlike traditional desserts that require refrigeration to maintain their texture and prevent spoilage, these desserts are crafted with ingredients that allow them to remain fresh and delicious without the need for cold storage. Think of brownies, bars, cookies, and certain cakes that retain their flavor and texture even after being left out for extended periods. These desserts are versatile, practical, and can be enjoyed on a whim without worrying about specific storage conditions.
Explaining the Benefits of Desserts That Don’t Require Refrigeration
There are several advantages to preparing desserts that don’t need refrigeration. Firstly, they are incredibly convenient. You can make them in advance, store them on your countertop, and serve them whenever the craving strikes or when guests arrive. This flexibility is perfect for busy lifestyles and for those who want to ensure that their desserts are ready to go at a moment’s notice.
Secondly, no-refrigeration desserts often maintain their texture and taste for longer periods. Many ingredients used in these recipes, such as flour, sugar, and cocoa powder, have a longer shelf life than delicate cream-based options that can spoil quickly. Moreover, these desserts are typically less prone to melting or losing shape, making them ideal for outdoor events, such as picnics or barbecues.
Lastly, they are often easier to transport. Whether you’re heading to a potluck or simply bringing dessert to a friend’s house, these treats can be packed without fear of compromising their quality. You can focus on enjoying the gathering instead of worrying about keeping your dessert cold.
Why Room Temperature Desserts Are Ideal for Certain Occasions
Room temperature desserts shine during various occasions. For example, they are perfect for summer gatherings or outdoor celebrations where refrigeration may not be readily available. Imagine a sunny picnic in the park with friends or family, where a tray of delicious chocolate squares can be shared and savored without the worry of melted frosting or curdled cream.
Additionally, no-refrigeration desserts are great for potlucks or bake sales. They can be made ahead of time, and their extended shelf life means they can sit out for several hours without losing their appeal. This makes them a favorite among those who want to contribute a delicious treat without the pressure of being tied to the kitchen at the last minute.
Furthermore, these desserts often appeal to a broader audience. Many people have dietary restrictions that may limit their options, such as lactose intolerance or a preference for vegan desserts. By focusing on no-refrigeration options, you can create inclusive treats that everyone can enjoy, regardless of their dietary needs.
Ingredients Breakdown
To create our delectable no-refrigeration chocolate squares, we’ll need a handful of essential ingredients that contribute to the rich flavor and satisfying texture of the dessert. Here’s an in-depth look at the key components:
All-Purpose Flour: The Base for Structure
All-purpose flour serves as the backbone of our dessert. It provides the necessary structure to hold the ingredients together while ensuring a delightful texture. When combined with other ingredients, flour helps create a chewy and tender crumb that is characteristic of many sweet treats.
Granulated Sugar: The Sweet Foundation
Granulated sugar is fundamental to this recipe, offering sweetness that balances the rich, bitter notes of cocoa powder. As sugar melts during baking, it contributes to the moistness of the dessert, creating a tender texture that is irresistible.
Unsweetened Cocoa Powder: The Heart of Chocolate Flavor
Cocoa powder is the star of this dessert, bringing that intense chocolate flavor that many of us crave. It adds depth and richness to the squares, making them truly indulgent. Choosing high-quality unsweetened cocoa powder will elevate the overall taste of your dessert.
Vegetable Oil: Ensuring Moisture and Texture
Vegetable oil is essential for keeping our chocolate squares moist and tender. Unlike butter, which can solidify when cooled, oil remains liquid at room temperature, contributing to a soft, chewy texture that is perfect for biting into. Additionally, vegetable oil blends seamlessly with dry ingredients, simplifying the mixing process.
Vanilla Extract: Enhancing the Overall Flavor Profile
Vanilla extract is a flavor enhancer that elevates the taste of our dessert. It adds a warm, aromatic quality that pairs beautifully with chocolate, creating a well-rounded flavor profile. Opting for pure vanilla extract can significantly boost the dessert’s overall taste.
Baking Powder and Salt: The Leavening Agents and Flavor Enhancers
Baking powder is crucial for providing lift to our chocolate squares, ensuring they rise and become fluffy rather than dense. A pinch of salt is equally important, as it accentuates the sweetness and balances the flavors, making the chocolate taste even richer.
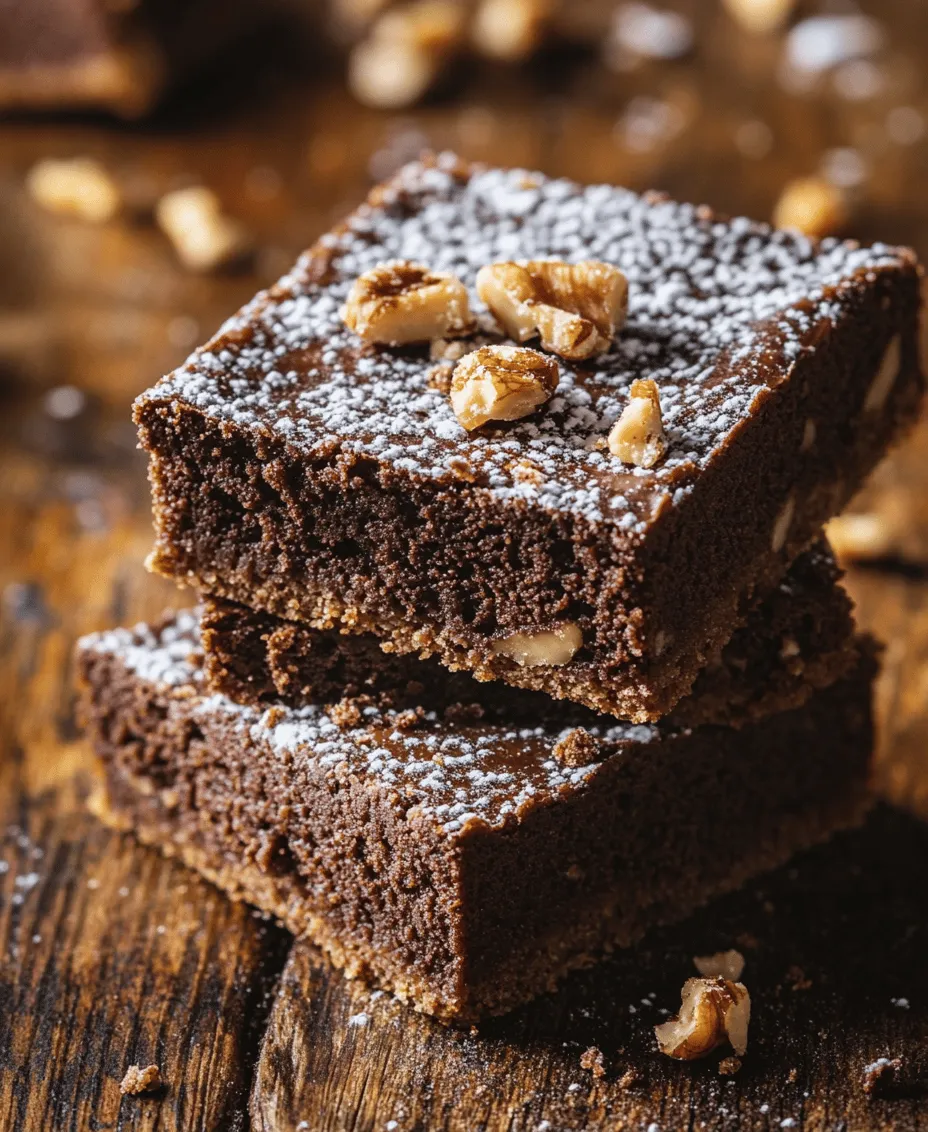
Chopped Nuts: Adding Texture and Taste
Chopped nuts, such as walnuts or pecans, can be added for an extra crunch and depth of flavor. They provide a contrast to the smooth chocolate and contribute healthy fats, making the dessert feel more indulgent and satisfying. However, nuts are optional, so feel free to omit them if you prefer a nut-free version.
Powdered Sugar: The Finishing Touch
Finally, powdered sugar may be used for dusting the top of the dessert, providing a beautiful finish and an additional touch of sweetness. It creates an appealing visual contrast against the dark chocolate squares, making them even more tempting.
Step-by-Step Instructions
Now that we have a clear understanding of our ingredients, it’s time to dive into the step-by-step instructions for preparing our delicious no-refrigeration chocolate squares. Following these guidelines will ensure that your dessert turns out perfectly every time.
Preparing for Baking
Preheating the Oven: Importance of Temperature Control
The first step in any baking process is preheating the oven. This ensures that your dessert will bake evenly and rise properly. Set your oven to 350°F (175°C), allowing it to reach the desired temperature while you prepare your batter. An adequately preheated oven is essential for achieving the best texture and flavor in your dessert.
Greasing the Baking Pan: Ensuring Easy Removal
Next, prepare your baking pan by greasing it lightly with vegetable oil or butter. This step is crucial for ensuring that your chocolate squares release easily from the pan after baking. If you prefer an added layer of security, you can also line the pan with parchment paper, allowing for effortless removal and ensuring the squares remain intact.
Mixing the Batter
With your oven preheated and your baking pan prepared, it’s time to mix the batter. This process involves combining the dry ingredients before adding the wet components to create a smooth, cohesive mixture.
Combining Dry Ingredients: Flour, Sugar, Cocoa Powder, Baking Powder, and Salt
In a large mixing bowl, combine the all-purpose flour, granulated sugar, unsweetened cocoa powder, baking powder, and salt. Whisk the dry ingredients together until they are well incorporated, ensuring an even distribution of flavors. This step is essential for achieving a uniform texture and taste throughout your chocolate squares.
Once the dry ingredients are fully combined, you’ll be ready to add your wet ingredients, including the vegetable oil and vanilla extract, to create a luscious batter that will bake into a decadent treat.
Stay tuned for the next part, where we’ll continue with the remaining steps for crafting these irresistible no-refrigeration chocolate squares, ensuring your dessert is both delicious and easy to serve!
Incorporating Wet Ingredients: Vegetable Oil and Vanilla Extract
To create the perfect sweet treat, the right balance of wet ingredients is essential. Begin by measuring out 1 cup of vegetable oil and 2 teaspoons of vanilla extract. Vegetable oil is a popular choice in dessert recipes due to its neutral flavor and ability to help achieve a moist texture. When added to your batter, it provides essential moisture without overpowering the other flavors.
In a large mixing bowl, combine the vegetable oil and vanilla extract with your dry ingredients. Be sure to mix thoroughly to ensure the wet ingredients are evenly incorporated. This step is crucial as it helps prevent clumps of dry ingredients from forming in the batter. The aroma of vanilla will begin to fill your kitchen, setting the stage for a delightful dessert experience.
Folding in Nuts: Ensuring Even Distribution
Nuts can add a delightful crunch and rich flavor to your sweet treat. If you choose to incorporate nuts, 1 cup of chopped walnuts or pecans is a fantastic option. To ensure even distribution throughout the batter, gently fold the nuts into the mixture using a spatula. This technique allows you to maintain the light and airy texture of the batter while evenly distributing the nuts.
Be cautious not to overmix the batter at this stage. Overmixing can lead to a denser texture, which we want to avoid. Instead, use soft, sweeping motions to combine the nuts, ensuring they are well-distributed and every bite will have that satisfying crunch.
Baking Process
Pouring and Spreading the Batter: Techniques for Even Baking
Once your batter is ready, it’s time to pour it into your prepared baking pan. For this recipe, a 9×13-inch baking pan works best. Start by greasing the pan lightly with non-stick spray or lining it with parchment paper for easy removal later.
Pour the batter into the center of the pan, allowing it to spread naturally. Using a spatula, gently spread the batter evenly across the surface of the pan. This technique ensures that the batter bakes evenly, resulting in a perfectly cooked dessert. Avoid pressing down too hard; you want to maintain the airiness of the batter.
Determining Doneness: The Toothpick Test Explained
While baking, keep an eye on the clock. Typically, your sweet treat will require about 30-35 minutes in a preheated oven at 350°F (175°C). To check for doneness, use the classic toothpick test. Insert a toothpick into the center of the dessert; if it comes out clean or with a few moist crumbs clinging to it, your dessert is ready. If the toothpick comes out with wet batter, it needs a few more minutes in the oven.
Each oven varies slightly, so it’s wise to start checking a few minutes before the timer goes off. Once baked, remove the pan from the oven and allow it to cool slightly in the pan before moving on to the next steps.
Cooling and Serving
Cooling in the Pan: Why It Matters
Letting the dessert cool in the pan for about 10-15 minutes is essential. This time allows the dessert to set properly and makes it easier to cut into squares without crumbling. The edges will begin to pull away from the sides of the pan, indicating it is ready for the next step.
Transferring to a Wire Rack: Techniques for Proper Cooling
After the initial cooling period, it’s time to transfer your sweet treat to a wire rack for complete cooling. To do this, carefully run a knife around the edges of the pan to loosen the dessert. If you’ve lined the pan with parchment paper, gently lift it out using the edges of the paper. Place the dessert on the wire rack to allow airflow, which helps prevent sogginess.
Allow the dessert to cool completely, which usually takes about 30-45 minutes. This step ensures that your sweet treat holds its shape and allows the flavors to settle.
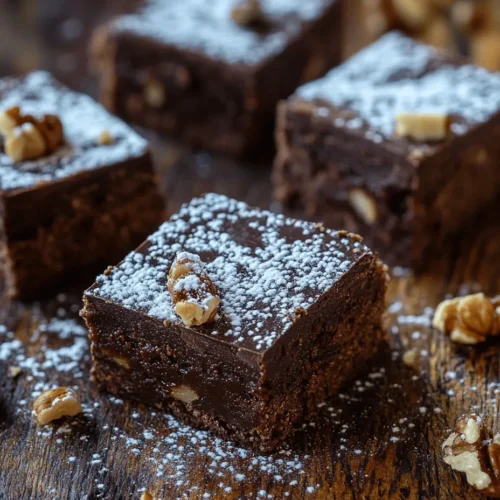
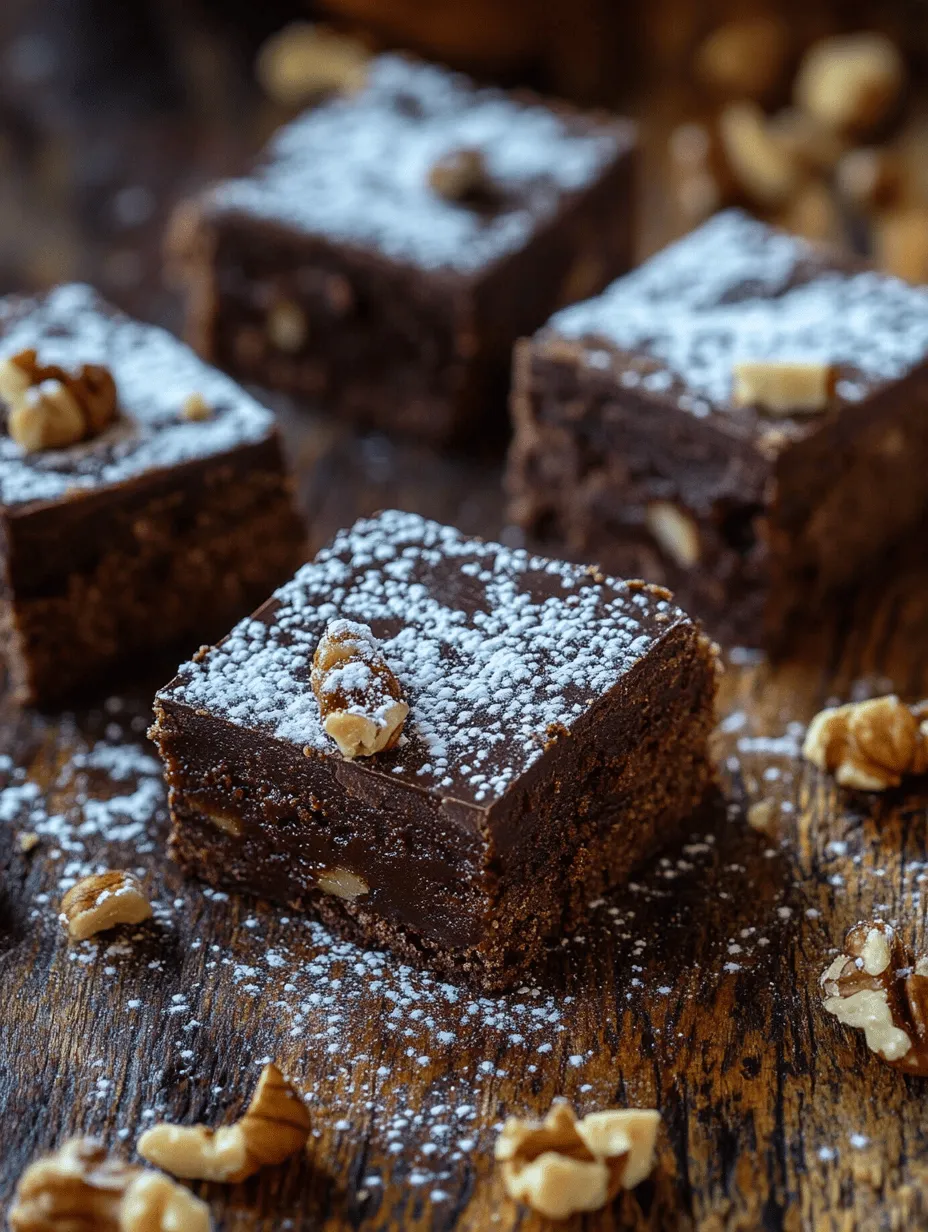
Dusting with Powdered Sugar: The Final Aesthetic Touch
For a finishing touch, dust your cooled dessert with powdered sugar. This not only adds a sweet contrast to the rich flavor of the treat but also enhances its visual appeal. Use a fine mesh sieve to sprinkle the powdered sugar evenly across the top, creating a beautiful snowy appearance.
Nutritional Information
Caloric Breakdown of Each Ingredient
Understanding the nutritional content of your sweet treat can help in making healthier choices. Here’s a brief caloric breakdown of the main ingredients:
– All-purpose flour (2 cups): Approximately 910 calories
– Granulated sugar (1 cup): Approximately 773 calories
– Vegetable oil (1 cup): Approximately 1,910 calories
– Vanilla extract (2 teaspoons): Approximately 24 calories
– Chopped nuts (1 cup): Approximately 800 calories
The total caloric content comes to around 4,417 calories for the entire dessert. If you cut the dessert into 16 squares, each serving would be about 276 calories.
Analyzing the Nutritional Content: Calories, Fats, Sugars
This dessert is indeed indulgent, containing fats primarily from the vegetable oil and nuts. Each square includes a delightful mix of carbohydrates from the sugar and flour, leading to a satisfying treat. However, be mindful of the sugar content, which can contribute to a quick spike in energy followed by a crash.
Healthier Alternatives: Modifications for Dietary Needs
For those looking to lighten the recipe, consider some modifications:
– Substitute vegetable oil with applesauce: This can reduce the fat content significantly while still keeping the dessert moist.
– Use whole wheat flour: This adds fiber and nutrients compared to all-purpose flour.
– Opt for a sugar substitute: Stevia or coconut sugar can be used to cut down on calories and sugars while maintaining sweetness.
Perfect Pairings for Your Sweet Treats
Complimentary Beverages
To elevate your dessert experience, consider pairing your sweet treat with the right beverages:
– Coffee and tea pairings: A rich, dark roast coffee or a smooth chai tea can complement the sweetness of your dessert beautifully. The bitterness of the coffee balances the sugar, creating a delightful harmony.
– Milk and alternative milks: A glass of cold milk or almond milk can help balance out the sweetness while adding a creamy texture that enhances the overall experience.
Creative Serving Suggestions
– Serving with fruits: Fresh fruits such as strawberries, raspberries, or even a scoop of vanilla ice cream can add a refreshing touch to your dessert. The acidity of the fruits cuts through the sweetness, adding complexity to each bite.
– Creating dessert platters: For gatherings, consider serving your sweet treats on a dessert platter alongside other treats like cookies or brownies. This not only provides variety but also enhances the visual appeal of your dessert table, making it more inviting.
Conclusion
In conclusion, this easy-to-make dessert recipe not only satisfies a chocolate craving but also offers the convenience of being a no-refrigeration treat. By understanding the ingredients, following the simple steps, and appreciating the final product, you can enjoy a deliciously rich dessert that is perfect for any occasion. Whether for a casual gathering or a cozy night in, these sweet squares are sure to please.
With the right balance of flavors, a satisfying texture, and the ease of preparation, you can share this dessert with your loved ones, creating lasting memories. Embrace the joy of baking, and indulge in the sweetness that comes from making treats that everyone can enjoy—no refrigeration required!