
Introduction
Delve into the sweet world of homemade confections with our delightful recipe for Six Minute Caramels. In just 20 minutes, you can create a batch of rich, buttery caramels that will satisfy any sweet tooth. These caramels are not just a treat; they are a culinary experience that transforms simple ingredients into something truly special. With an easy-to-follow method, this recipe ensures a smooth texture and the perfect balance of sweetness and saltiness, making it an ideal indulgence for special occasions or just a cozy night in.
Caramels have an irresistible allure, and the charm of making them at home adds to their appeal. The satisfaction of crafting your own candies can turn an ordinary day into a sweet celebration. Whether you’re sharing them with friends, wrapping them as homemade gifts, or simply enjoying them yourself, these Six Minute Caramels are sure to bring joy. Join us as we explore the history of caramel, break down the essential ingredients, and guide you through the exciting process of creating these delightful treats.
Understanding the Allure of Caramels
The History of Caramel
Caramel has a rich history that dates back centuries, with its origins believed to be traced to the Middle Ages. The word “caramel” is derived from the Latin “cannamella,” meaning “sugar cane.” Initially, this sweet treat was made by melting sugar and combining it with various flavorings. Over time, caramel evolved from a simple candy to a complex confection, with variations that include caramel sauce, chewy caramels, and even caramel-flavored desserts.
In the 19th century, advancements in sugar refining and cooking techniques allowed for the production of more sophisticated caramel recipes. It became a staple in candy shops and was often enjoyed as a luxurious treat. The introduction of cream and butter into caramel recipes resulted in the rich, creamy varieties we know and love today. Today, caramels are a beloved treat worldwide, celebrated for their delightful taste and versatile nature.
Cultural Significance of Caramel Treats
Caramels hold a special place in various cultures around the globe. In the United States, they are often associated with nostalgic childhood memories, with many recalling trips to candy stores or enjoying homemade caramels during the holidays. Different regions have their unique takes on caramels; for example, in France, caramel is often paired with sea salt to create the famous fleur de sel caramels, which balance savory and sweet flavors.
In Latin America, caramel is transformed into “dulce de leche,” a creamy, caramelized milk spread that is a favorite in desserts and pastries. Asian cultures also embrace caramel, incorporating it into traditional sweets and candies. Throughout history, caramels have played a role in celebrations, from weddings to holidays, symbolizing sweetness and joy.
Ingredients Breakdown for Six Minute Caramels
Essential Ingredients
To create your Six Minute Caramels, you will need just a few essential ingredients, each playing a crucial role in achieving that perfect caramel texture and flavor:
– Unsalted Butter: The foundation of your caramels, butter adds richness and creaminess. Using unsalted butter allows you to control the salt level in the final product.
– Granulated Sugar: The primary sweetener in this recipe, sugar is responsible for the caramelization process, which gives caramels their characteristic flavor and color.
– Corn Syrup: This ingredient is essential for preventing crystallization, ensuring that your caramels have a smooth, velvety texture. It helps keep the sugar syrup stable as it cooks.
– Sweetened Condensed Milk: This adds creaminess and depth of flavor to your caramels. It also contributes to the overall sweetness and helps achieve the desired consistency.
– Vanilla Extract: A touch of vanilla enhances the flavor profile, adding warmth and complexity to the caramels.
– Salt: A pinch of salt elevates the sweetness of the caramels, providing a perfect balance of flavors.
Understanding the Science Behind the Ingredients
The magic of caramel lies in the chemistry of its ingredients. When sugar is heated, it undergoes a process known as caramelization. This occurs when sugar molecules break down and reform into new compounds, resulting in the complex flavors and colors associated with caramel. The addition of butter creates a creamy texture, while corn syrup helps inhibit crystallization, allowing the sugar to melt evenly.
When sweetened condensed milk is introduced, it adds a creamy richness that enhances the caramels’ mouthfeel and flavor. The combination of these ingredients needs to be carefully controlled during cooking to reach the perfect temperature and consistency. Understanding this science not only helps you achieve the best results but also opens the door to experimenting with your caramel creations.
Optional Add-ins for Customization
One of the best parts about making caramels at home is the ability to customize them to your liking. Here are a few optional add-ins to consider:
– Chopped Nuts: Adding crushed nuts such as pecans, walnuts, or almonds can introduce a delightful crunch and nutty flavor to your caramels.
– Chocolate Chips: Swirling in chocolate chips at the end of cooking can create a decadent chocolate caramel hybrid.
– Flavored Extracts: Beyond vanilla, consider experimenting with other extracts like almond, peppermint, or orange for a unique twist on traditional caramels.
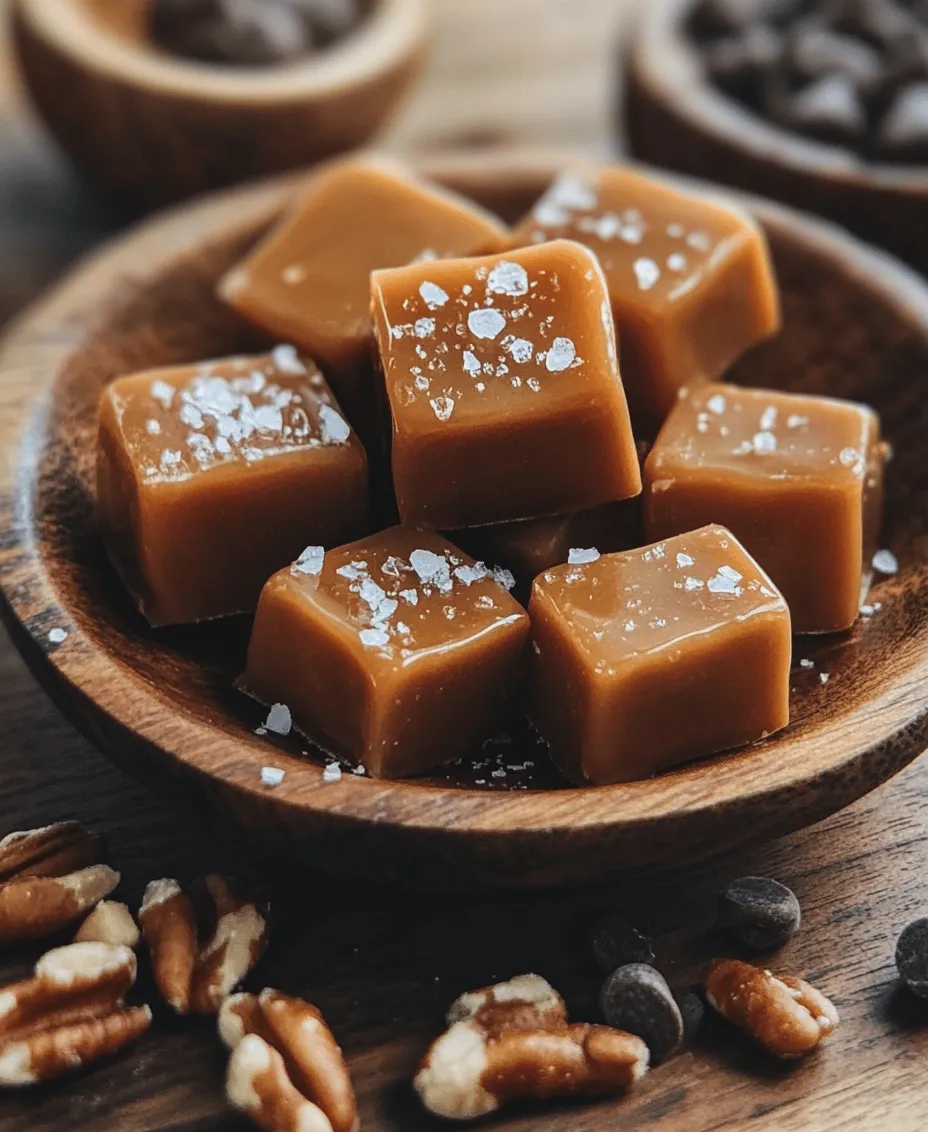
– Sea Salt: For those who love the sweet and salty contrast, sprinkling flaky sea salt on top of your caramels before they set will add a beautiful finish and enhance the overall flavor.
Step-by-Step Guide to Making Six Minute Caramels
Preparation and Equipment Needed
Before diving into the cooking process, it’s essential to gather all your ingredients and equipment. Here’s what you’ll need:
Equipment:
– A heavy-bottomed saucepan: This ensures even heat distribution, which is crucial for caramel-making.
– A wooden spoon or silicone spatula: For stirring the ingredients as they cook.
– A candy thermometer: This tool is vital for monitoring the temperature of the caramel mixture to ensure it reaches the correct consistency.
– A parchment-lined baking dish: This will be used to pour the finished caramel mixture, allowing it to set properly.
Ingredients:
– 1 cup unsalted butter
– 2 cups granulated sugar
– 1 cup corn syrup
– 1 can (14 oz) sweetened condensed milk
– 1 teaspoon vanilla extract
– 1/4 teaspoon salt
– Optional add-ins (chopped nuts, chocolate chips, etc.)
Melting the Butter and Combining Ingredients
Start by placing your heavy-bottomed saucepan on medium heat. Add the unsalted butter and let it melt completely, stirring gently to ensure it doesn’t brown. Once the butter is melted, gradually add the granulated sugar and corn syrup, stirring continuously to combine all the ingredients thoroughly.
After the sugar and corn syrup are well-mixed with the melted butter, it’s time to incorporate the sweetened condensed milk. Slowly pour in the condensed milk while stirring constantly. This step is crucial, as it ensures that the mixture remains smooth and prevents any lumps from forming.
Bringing the Mixture to a Boil
Once all the ingredients are well combined, increase the heat to medium-high and bring the mixture to a gentle boil. It is essential to keep stirring during this process to prevent the caramel from sticking to the bottom of the pan and burning. As the mixture heats, use your candy thermometer to monitor the temperature closely.
The goal is to bring the caramel mixture to the “soft ball stage,” which is around 235°F to 240°F (113°C to 115°C). This stage is critical for achieving that perfect chewy texture. To check if your caramel has reached the right stage, you can drop a small amount of the mixture into a glass of cold water. If it forms a soft ball that holds its shape but can be flattened, you’re ready for the next step.
Achieving the Perfect Soft Ball Stage
As you reach the soft ball stage, it’s vital to remove the saucepan from the heat immediately. Continuing to cook the caramel beyond this point can lead to a firmer texture than desired. Once removed from heat, stir in the vanilla extract and salt, mixing well to combine.
At this point, if you’re adding any optional ingredients like nuts or chocolate chips, fold them in gently. Then, carefully pour the hot caramel mixture into your prepared parchment-lined baking dish. Spread it out evenly using a spatula, and allow it to cool at room temperature.
With the caramel mixture in the dish, let it set for several hours or until completely firm. Once set, you can cut it into squares or rectangles and wrap them in wax paper or cellophane for gifting or storage.
The journey of creating Six Minute Caramels is not just about following a recipe; it’s about embracing the process and celebrating the joy of making something sweet from scratch. As you prepare to embark on this delicious adventure, remember that each step brings you closer to enjoying your homemade caramels. So, gather your ingredients, prepare your kitchen, and get ready to indulge in the delightful world of caramel-making.
Understanding the Soft Ball Stage in Candy Making
Before you dive into the pouring and cooling process of your Six Minute Caramels, it’s crucial to understand the soft ball stage, a key milestone in candy making. The soft ball stage occurs when the sugar mixture reaches a temperature of approximately 234°F to 240°F (112°C to 115°C). At this point, a small amount of the caramel can be dropped into cold water, and if it forms a soft, pliable ball that can be flattened between your fingers, you’ve successfully reached this critical stage.
To accurately test for the soft ball stage, you can use a candy thermometer. Ensure the thermometer is properly calibrated and submerged in the mixture without touching the bottom of the pot, which can give you a false reading. For those who prefer a more hands-on approach, the cold water test is an effective alternative. Simply fill a bowl with ice water, drop a teaspoon of the caramel mixture into it, and check the consistency after a few seconds. If it forms a soft ball, you are good to go.
Pouring and Cooling the Caramels
Once your mixture has reached the soft ball stage, it’s time to pour the caramel into your prepared baking pan. This step requires care to ensure even distribution and prevent spills. Here’s how to do it properly:
1. Prepare Your Baking Pan: Line an 8×8 inch (20×20 cm) baking pan with parchment paper, allowing some overhang on the sides for easy removal later. Lightly grease the paper with butter or cooking spray to prevent sticking.
2. Pour the Caramel: Using a heat-resistant spatula, carefully pour the hot caramel into the center of the prepared pan. Tilt the pan slightly to help the caramel spread out evenly. Avoid scraping the sides of the pot, as this can introduce crystallization into your mixture.
3. Cooling: Let the caramel sit at room temperature for at least 2 hours until set. Avoid refrigerating, as this can change the texture of the caramel. Ensure the area is free from drafts and disturbances to promote even cooling.
Variations and Customizations for Six Minute Caramels
Creating your Six Minute Caramels is just the beginning. With simple additions and modifications, you can craft a variety of flavors and textures to suit your taste.
Flavor Enhancements
To elevate the flavor of your caramels, consider adding extracts or spices during the cooking process. Here are some ideas to inspire you:
– Vanilla Extract: A classic addition that enhances the caramel’s sweetness. Add 1 teaspoon at the end of cooking for a rich flavor.
– Sea Salt: Adding a pinch of sea salt not only enhances the flavor but also balances the sweetness. Sprinkle it on top of the caramel just before it sets.
– Cinnamon or Nutmeg: A dash of ground cinnamon or nutmeg can add a warm, cozy flavor, perfect for fall or winter treats.
Nut and Chocolate Combinations
Incorporating nuts or chocolate can add delightful textures and flavors to your caramels:
– Nuts: Chopped pecans, walnuts, or almonds can be mixed into the caramel before pouring. Toasting the nuts beforehand will enhance their flavor.
– Chocolate Drizzle: Melt some chocolate and drizzle it over the cooled caramels for a decadent finish. Dark, milk, or white chocolate all work beautifully.
Decorative Finishes
To make your caramels visually appealing and add an extra touch of flavor:
– Sea Salt Sprinkles: Just before the caramel sets, sprinkle some flaky sea salt on top. It adds a sophisticated touch and a delightful contrast to the sweetness.
– Chocolate Coating: After the caramels are set and cut, dip them in melted chocolate for a rich, indulgent treat. Let the chocolate harden before serving.
Serving Suggestions for Six Minute Caramels
Once your caramels are made and cooled, you’ll want to present them beautifully. Here are some creative serving suggestions:
Creative Ways to Serve
– Candy Buffet: Arrange your caramels on a decorative platter alongside other treats for a delightful candy buffet at parties. Use small cups or jars for guests to take home.
– Dessert Charcuterie Board: Include your caramels on a dessert charcuterie board with fruits, nuts, and other candies. This visually appealing setup will impress your guests and provide a variety of flavors.
Gift-Giving Ideas
Homemade caramels make thoughtful gifts for any occasion. Here are some ways to package them:
– Cellophane Bags: Place individual caramels in clear cellophane bags and tie with a ribbon. This adds a personal touch and makes them easy to distribute.
– Decorative Boxes: For a more elegant presentation, place caramels in a small decorative box lined with tissue paper. Add a handwritten note or label for a personal flair.
Storing and Preserving Your Caramels
To enjoy your delicious Six Minute Caramels over time, proper storage is key.
Best Practices for Storage
– Cool and Dry Place: Store the caramels in an airtight container in a cool, dry place. This will help maintain their texture and prevent them from becoming too sticky.
– Layering: If stacking caramels, place parchment paper between layers to prevent sticking.
How Long Do Caramels Last?
Homemade caramels can last for about 2 to 3 weeks when stored properly. To ensure they are still good, check for any changes in texture or smell. If they become overly sticky or develop an off-odor, it’s best to discard them.
Conclusion
Creating Six Minute Caramels is not only a rewarding experience but also a delightful way to treat yourself and others. With its simple ingredients and quick preparation time, this recipe is perfect for both novice and experienced candy makers. Whether enjoyed fresh or given as gifts, these caramels are sure to bring joy and sweetness to any occasion. Embrace the art of candy-making and savor the delicious results of your efforts. The beauty of this recipe lies in its versatility, allowing you to customize flavors, textures, and presentations to make them uniquely yours. So gather your ingredients and start your candy-making adventure today—these caramels are just a few minutes away from delighting your taste buds!