Introduction
Desserts have an extraordinary ability to evoke joy and create memorable moments, making them an essential part of celebrations across the globe. Whether it’s a birthday party, holiday gathering, or a simple afternoon treat, desserts are often the centerpiece that brings people together. Among the vast array of sweet options, the Red Velvet Oreo Cheesecake stands out as a deliciously indulgent favorite.
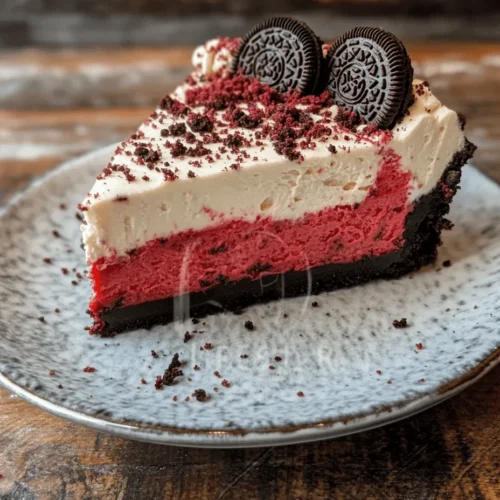
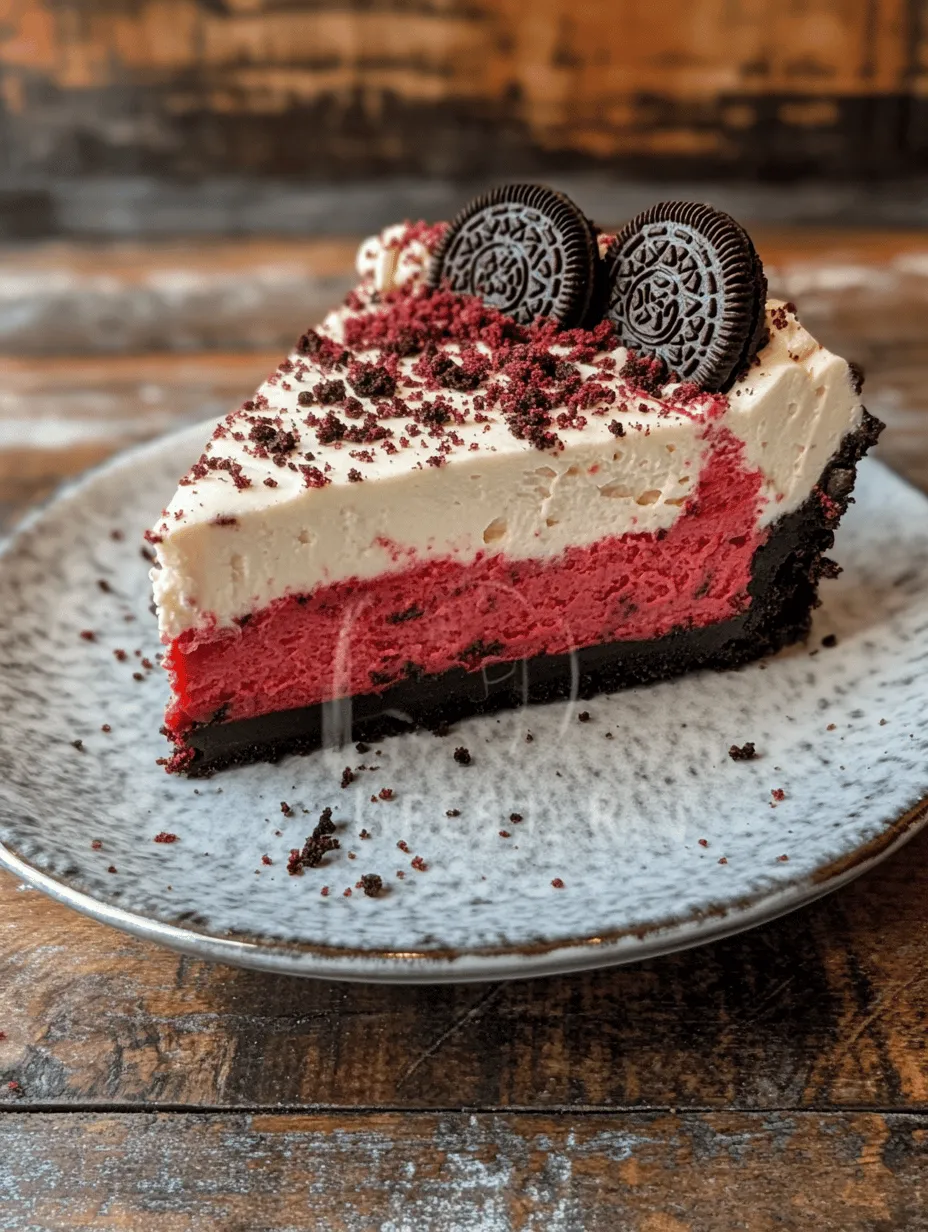
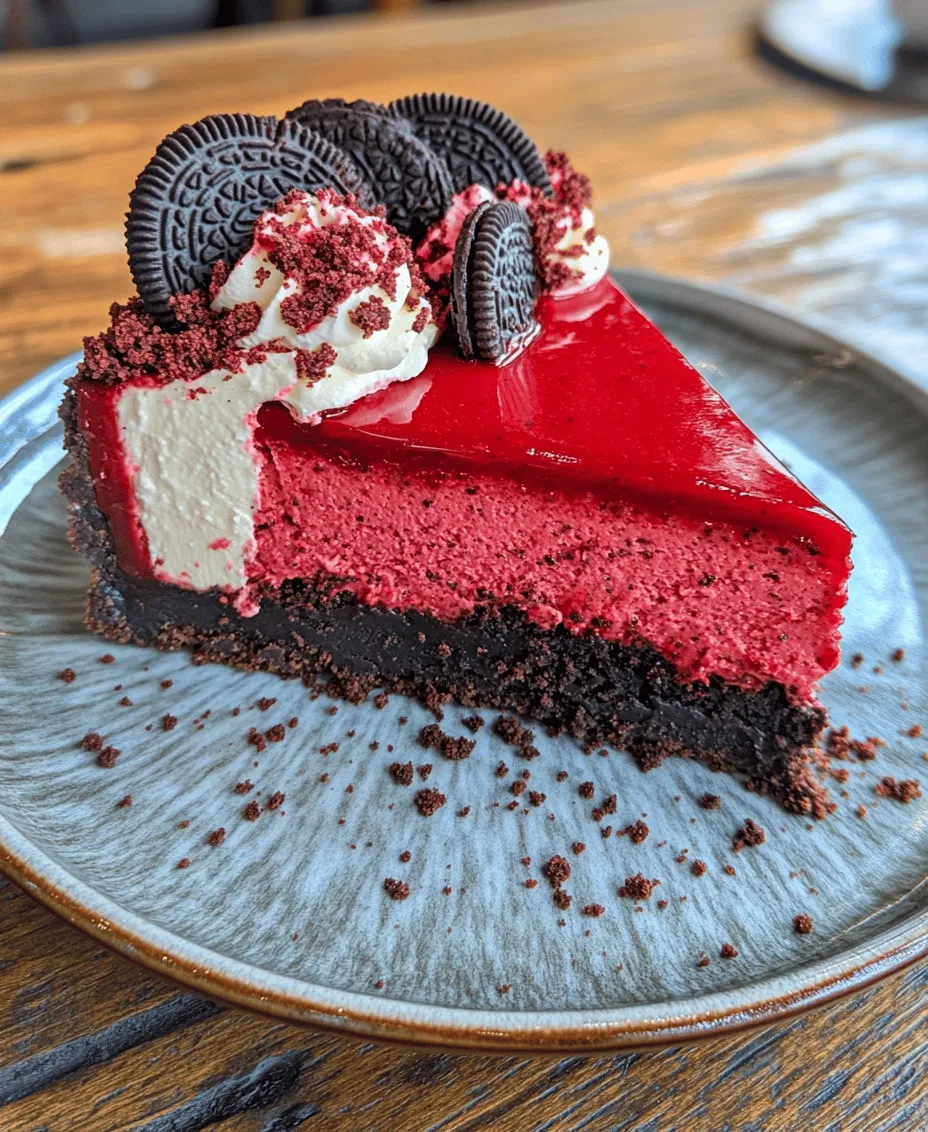
This unique dessert marries the classic flavors of red velvet cake with the creamy richness of cheesecake, enhanced by the nostalgic taste of Oreos. Imagine a velvety red cheesecake, perfectly complemented by a crunchy Oreo crust. It’s not just a feast for the taste buds; this dessert is a visual delight, with its vibrant red hue making it an eye-catching centerpiece for any occasion.
The appeal of the Red Velvet Oreo Cheesecake extends beyond its taste and appearance. It’s a versatile dessert suitable for various celebrations, from birthdays to holidays, and even casual get-togethers. Whether you’re looking to impress guests at a dinner party or simply indulge in a sweet treat at home, this cheesecake is sure to satisfy all cravings. In this article, we will guide you through every step of crafting this delightful dessert, ensuring that your experience in the kitchen is as rewarding as the final result.
Understanding the Ingredients
To create the perfect Red Velvet Oreo Cheesecake, it’s essential to understand the role each ingredient plays in achieving the desired flavor and texture. Let’s take a closer look at the key components of this recipe:
Crushed Oreo Cookies
The foundation of this cheesecake begins with crushed Oreo cookies. Their distinct flavor and crunchy texture create a delightful contrast to the creamy cheesecake filling. The rich chocolate flavor of the Oreos enhances the overall taste profile of the dessert, while the crispy texture adds a satisfying crunch. When crushed, the cookies serve as both a base for the crust and a flavorful element that pairs beautifully with the red velvet cheesecake.
Unsalted Butter
Unsalted butter is a crucial ingredient in many dessert recipes, and it plays a vital role in this cheesecake as well. It acts as a binding agent for the crushed Oreo crust, helping to hold the mixture together while providing a rich flavor. Using unsalted butter allows you to control the salt content in your cheesecake, ensuring that it complements rather than overwhelms the other flavors.
Cream Cheese
The star of the show in any cheesecake is undoubtedly cream cheese. Its creamy texture and tangy flavor form the base of the cheesecake filling. Cream cheese lends a luxurious mouthfeel to the dessert, ensuring each bite is rich and satisfying. When whipped to perfection, it creates a smooth batter that sets beautifully during the baking process.
Powdered Sugar
For the right level of sweetness and smooth consistency, powdered sugar is the go-to choice in this recipe. Unlike granulated sugar, powdered sugar dissolves easily, allowing for a creamy texture without any graininess. It also helps to stabilize the cheesecake filling, contributing to its overall structure.
Sour Cream
Sour cream adds an additional layer of richness and a subtle tang to the cheesecake. This ingredient not only enhances the flavor but also contributes to the creaminess of the filling. Incorporating sour cream into the batter helps achieve a velvety texture that melts in your mouth.
Red Velvet Cake Mix
The vibrant color and distinct flavor of red velvet cake come from the red velvet cake mix used in this recipe. This ingredient provides the signature red hue that makes this cheesecake visually stunning. Additionally, the cake mix adds a touch of cocoa flavor, enhancing the overall taste profile.
Eggs
Eggs act as a binding agent in the cheesecake batter, helping to create structure and stability. They play a crucial role in achieving the right texture, ensuring that the cheesecake is both creamy and firm enough to hold its shape after baking. Beaten eggs incorporated into the filling will help achieve a smooth and cohesive batter.
Vanilla Extract
A splash of vanilla extract elevates the flavor profile of the cheesecake, adding warmth and depth. This simple ingredient enhances the overall taste, ensuring that every bite is bursting with flavor. The aromatic qualities of vanilla complement the rich cream cheese and chocolate notes from the Oreos perfectly.
Additional Toppings
While the Red Velvet Oreo Cheesecake is delightful on its own, the possibilities for creative toppings are endless. Consider options such as whipped cream, chocolate shavings, or additional crushed Oreos for added texture and flavor. Fresh berries or a drizzle of chocolate sauce can also provide a beautiful contrast to the vibrant red hue of the cheesecake, making it even more visually appealing.
Preparation Steps Explained
Now that we’ve covered the essential ingredients, it’s time to dive into the preparation steps that will lead you to create this delectable Red Velvet Oreo Cheesecake. Each step is crucial in ensuring the perfect dessert, so let’s break it down:
Preheating the Oven
Before you begin assembling your cheesecake, preheating the oven is a critical first step. Proper temperature control is essential in baking, especially for cheesecakes, which require a gentle and steady heat to set without cracking. Preheat your oven to 325°F (160°C) to ensure it reaches the ideal temperature for baking.
Preparing the Crust
To achieve the perfect crust, start by finely crushing the Oreo cookies. You can do this using a food processor or by placing them in a resealable bag and crushing them with a rolling pin. Once crushed, combine the cookie crumbs with melted unsalted butter in a mixing bowl. The butter will help bind the crumbs together, creating a cohesive mixture that holds its shape when pressed into the pan.
Next, press the crust mixture firmly into the bottom of a springform pan, ensuring an even layer. The crust should be compact to provide support for the creamy filling. Once you’ve achieved the desired texture, place the crust in the preheated oven for about 10 minutes to set. This step helps to create a firm base that will hold up during baking and slicing.
Making the Cheesecake Filling
After the crust has baked and cooled slightly, it’s time to prepare the cheesecake filling. In a large mixing bowl, beat the softened cream cheese until smooth and creamy. This step is crucial, as it ensures that there are no lumps in your batter. Gradually add the powdered sugar, mixing until fully incorporated. The mixture should be velvety and sweet, setting the stage for the addition of other ingredients.
Next, mix in the sour cream and vanilla extract, blending until the mixture is smooth. Once combined, add the eggs one at a time, mixing gently after each addition. Be careful not to overmix, as this can incorporate too much air into the batter, leading to cracks during baking.
Finally, add the red velvet cake mix to the filling, mixing until just combined. The batter should be rich and vibrant, showcasing that beautiful red color. Pour the cheesecake filling over the prepared crust, smoothing the top with a spatula.
Baking Techniques
Baking a cheesecake requires careful attention to detail to prevent cracks and ensure even cooking. To create a gentle baking environment, consider using a water bath. This technique involves placing the springform pan in a larger baking dish filled with water. The steam from the water helps regulate the temperature and keeps the cheesecake moist throughout the baking process.
Place the cheesecake in the preheated oven and bake for approximately 60-70 minutes, or until the edges are set but the center is still slightly jiggly. This is a crucial step; overbaking can lead to a dry texture and unsightly cracks. Once the cheesecake is done, turn off the oven and leave the door slightly ajar, allowing the cheesecake to cool gradually. This slow cooling process helps prevent sudden temperature changes that can cause cracks.
As the cheesecake cools, resist the temptation to open the oven door fully. Instead, let it cool in the oven for about an hour before transferring it to the refrigerator. Chilling the cheesecake for at least four hours—or preferably overnight—will help it set perfectly and enhance the flavors.
By understanding the ingredients and following these preparation steps, you are well on your way to creating a stunning Red Velvet Oreo Cheesecake. In the next part of this article, we will explore tips for achieving the best results and answer some common questions regarding this delectable dessert. Stay tuned!
Cooling and Refrigeration
After baking your Red Velvet Oreo Cheesecake, the cooling and refrigeration process is critical for achieving that perfect texture. Cheesecakes are known for their creamy consistency, but this can only be attained if you allow sufficient time for cooling. Once the cheesecake is out of the oven, let it cool at room temperature for about an hour. This step helps to prevent cracks from forming on the surface, which can happen if the cheesecake cools too quickly.
After it has cooled down, cover the cheesecake with plastic wrap or aluminum foil and transfer it to the refrigerator. The cheesecake needs to chill for at least four hours, but overnight is ideal. This extended refrigeration not only allows the flavors to meld beautifully but also helps the cheesecake to set properly. The result is a luscious, rich dessert that slices perfectly and has a melt-in-your-mouth quality.
Presentation Tips
When it comes to presenting your Red Velvet Oreo Cheesecake, creativity can elevate the dessert from delicious to stunning. Here are some ideas for garnishing that will impress your guests:
1. Oreo Crust Crumble: Reserve some of the crushed Oreo cookies used in the crust. Sprinkle these crumbs over the top of the cheesecake for a delightful crunch and visual contrast.
2. Red Velvet Crumbs: Crumble some baked red velvet cake and sprinkle it artistically around the edges of the cheesecake. This adds a pop of color and reinforces the red velvet theme.
3. Whipped Cream: Pipe dollops of freshly whipped cream on top of the cheesecake. You can add a touch of red food coloring to the cream for an eye-catching effect.
4. Chocolate Ganache Drizzle: Create a simple ganache by melting chocolate with a little heavy cream. Drizzle this over the cheesecake for a luxurious finish.
5. Fresh Berries: Add a touch of freshness with some strawberries or raspberries. Their tartness complements the sweetness of the cheesecake perfectly.
Baking Science Behind Cheesecake
Baking a cheesecake is as much a science as it is an art. Understanding the chemical reactions that occur during the baking process can help you achieve the desired outcome.
Role of Eggs in Setting the Structure: Eggs are a crucial ingredient in cheesecake. They serve as a binding agent, helping to set the structure as the cheesecake bakes. When eggs are whisked and incorporated, they create air pockets that contribute to the cheesecake’s lightness. As the cheesecake bakes, the proteins in the eggs coagulate, giving the cheesecake its firm but creamy texture.
Impact of Temperature on Texture: The temperature of your ingredients plays a significant role in the final texture of your cheesecake. Using room temperature cream cheese, eggs, and sour cream ensures even mixing and prevents lumps. Additionally, baking the cheesecake at a lower temperature allows for gentle cooking, which helps to minimize cracks and achieve a smooth surface.
Cooling Effects on Consistency and Flavor: The cooling process after baking is crucial. As the cheesecake cools, the flavors deepen, and the texture becomes creamier. Rapid cooling can lead to cracks and an uneven texture. Hence, patience during this phase is key to achieving that signature cheesecake consistency.
Flavor Profiles and Pairings
The combination of red velvet and Oreo creates a flavor profile that is both rich and indulgent. The smooth, buttery taste of cream cheese pairs perfectly with the cocoa flavor of the red velvet and the crunchy, chocolatey notes of the Oreos. This delightful combination offers a complex taste that is sure to please any palate.
Complementary Flavors and Beverages: To elevate your dessert experience, consider pairing your cheesecake with complementary flavors. A drizzle of caramel sauce can add an extra layer of sweetness, while a sprinkle of sea salt can enhance the chocolate notes.
When it comes to beverages, a rich coffee or espresso complements the cheesecake beautifully, balancing its sweetness with a robust flavor. For a non-caffeinated option, a glass of cold milk or a sweet dessert wine like Port can enhance the overall enjoyment.
Exploring Variations: Don’t hesitate to experiment with variations of this recipe. Consider adding a layer of chocolate ganache on top before chilling, or mixing in some crushed peppermint candies for a seasonal twist. You might also try different toppings—think fresh fruit, chocolate shavings, or even a layer of peanut butter for an indulgent surprise.
Serving Suggestions
Serving your Red Velvet Oreo Cheesecake can be as creative as the preparation. Here are some imaginative ideas to enhance the dessert experience:
1. Layered Dessert Cups: For an elegant presentation, layer pieces of cheesecake with whipped cream and crushed Oreos in individual dessert cups. This not only looks stunning but allows guests to enjoy a personal serving.
2. Cheesecake Wedges: When slicing the cheesecake, use a hot knife (run it under hot water and wipe it dry) to achieve clean edges. Each slice should reveal the beautiful red velvet and Oreo layers.
3. Cheesecake Tasting Platter: Create a dessert platter with slices of cheesecake alongside mini cupcakes, cookies, or chocolate truffles. This variety will please a crowd and enhance the overall presentation.
4. Cheesecake with Ice Cream: Serve a slice of cheesecake with a scoop of vanilla or cookies and cream ice cream. The creaminess of the ice cream contrasts beautifully with the dense texture of the cheesecake.
Storing and Preserving Your Cheesecake
To maintain the freshness of your Red Velvet Oreo Cheesecake, proper storage is essential. Here are some best practices:
1. Refrigeration: Store the cheesecake in the refrigerator if you plan to consume it within a week. Cover it with plastic wrap or aluminum foil to prevent it from absorbing odors from other foods.
2. Freezing: For long-term storage, you can freeze your cheesecake. Wrap it tightly in plastic wrap and then in aluminum foil to prevent freezer burn. It can be kept frozen for up to three months. To thaw, place it in the refrigerator overnight before serving.
3. Shelf Life: When stored properly in the refrigerator, your cheesecake will last about 5-7 days. If it starts to develop an off smell or unusual texture, it’s best to discard it.
Conclusion
In summary, the Red Velvet Oreo Cheesecake is more than just a dessert; it’s an indulgence that brings joy and satisfaction to those who create and share it. The harmonious blend of flavors, coupled with the rich texture, makes it a standout treat for any occasion.
Encouraging you to experiment with the recipe allows for personalization, transforming it into your own beloved creation. Remember, homemade desserts are not just about the sweet taste; they are about the memories created in the kitchen. Embrace the joy of baking, and let this delightful cheesecake become a staple in your dessert repertoire.