Mini Red Velvet Oreo Cheesecakes: A Delightful Dessert Experience

Sharing is caring!

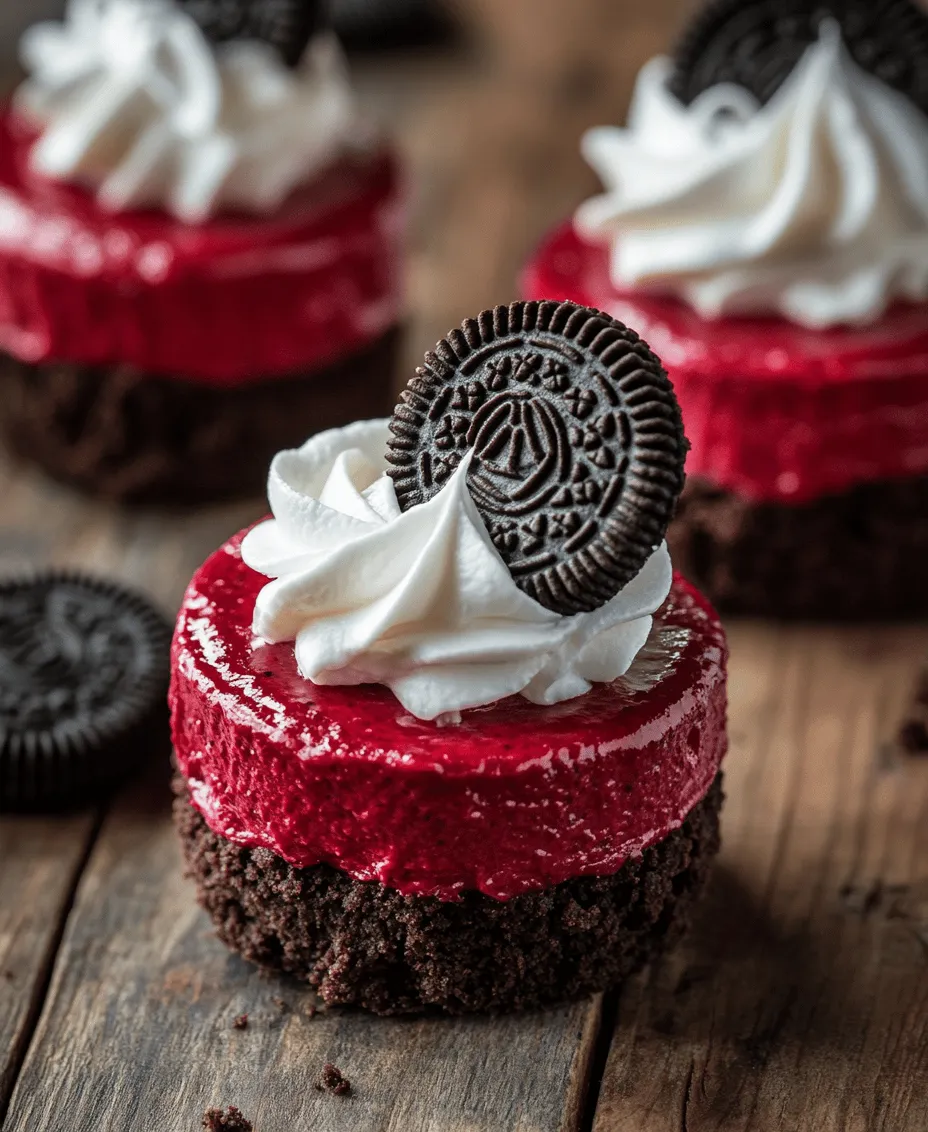
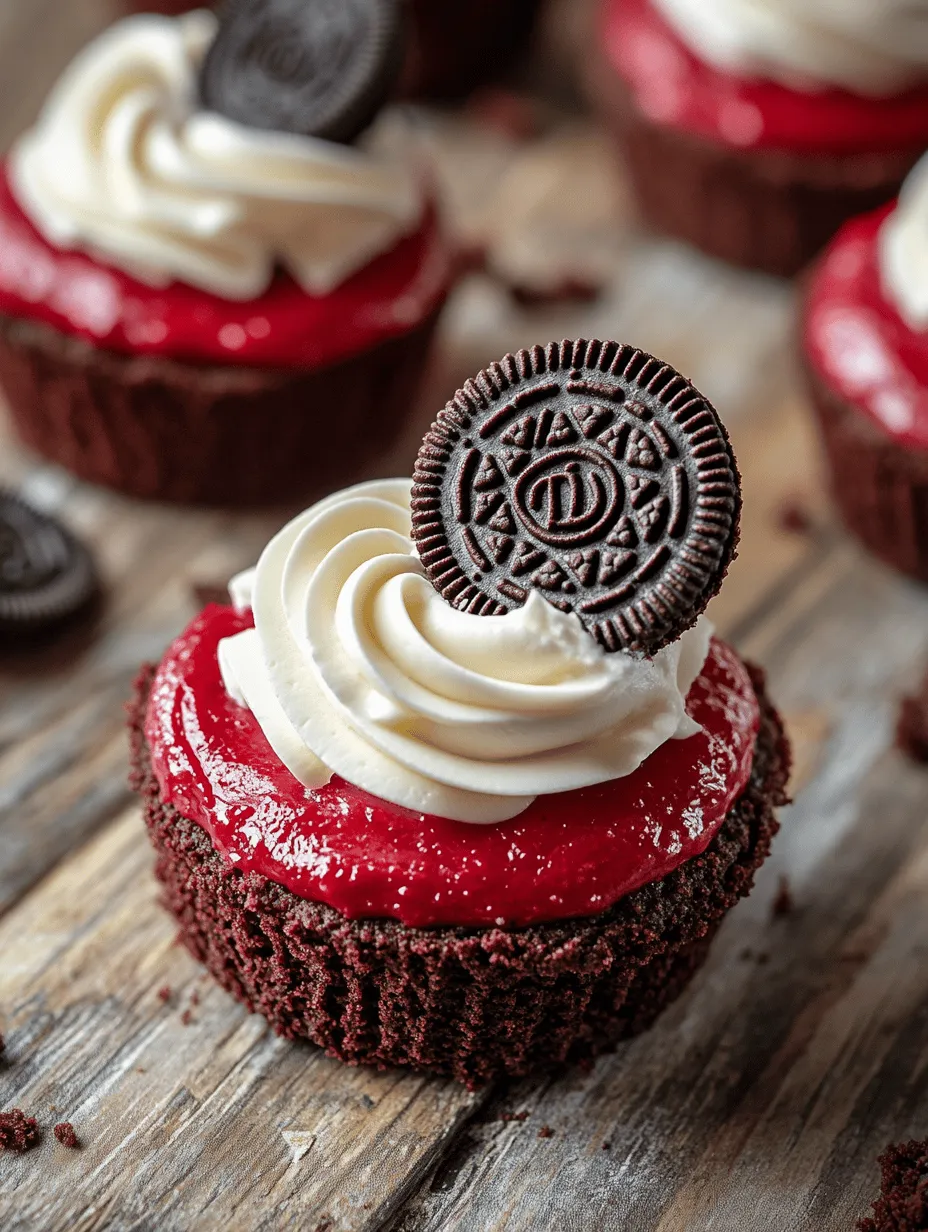
Indulging in desserts that spark joy is an essential part of culinary exploration, and Mini Red Velvet Oreo Cheesecakes are a delightful treat that combines the richness of cheesecake with the whimsical charm of red velvet. These charming mini cheesecakes are not just visually appealing with their vibrant red hue but also offer a delectable fusion of flavors that captivate dessert lovers. They embody the perfect balance of creamy, sweet, and slightly tangy notes, making them an ideal choice for celebrations, gatherings, or simply a sweet indulgence at home.

The allure of red velvet cake has grown tremendously over the years, becoming a favorite for many. Its rich and velvety texture, combined with the subtle cocoa flavor, makes it a standout among dessert options. When you add the creamy goodness of cheesecake to the mix, you create a dessert that is both comforting and sophisticated. This article provides a comprehensive guide to creating these irresistible desserts, complete with insights into their ingredients, preparation methods, and serving suggestions.

Understanding the Ingredients

Exploring the components of Mini Red Velvet Oreo Cheesecakes reveals the thoughtful balance of flavors and textures that make them so special. Each ingredient plays a crucial role in achieving the desired taste and presentation, ensuring that every bite is a delightful experience.

The Base: Oreo Crust

The foundation of these mini cheesecakes is a delectable Oreo crust. Oreo cookies are not just a delicious treat on their own; they bring a rich chocolate flavor and a delightful crunch that pairs perfectly with the creamy filling. The dark, chocolatey notes of the Oreos complement the sweetness of the red velvet cheesecake, creating a harmonious flavor profile.

To enhance the texture of the crust, melted butter is added. This ingredient binds the crushed cookies together, providing a rich, buttery flavor while ensuring a firm and cohesive base. It is crucial to use high-quality Oreo cookies for the best flavor. The classic chocolate and cream combination of Oreos provides the perfect backdrop for the luxurious cheesecake filling.

The Cheesecake Filling

The star of the show, of course, is the cheesecake filling, which is primarily made with cream cheese. Cream cheese offers a smooth, rich texture and a tangy flavor that is essential for a classic cheesecake. The luxurious creaminess of the cheese pairs beautifully with the sweetness of the other ingredients.

Granulated sugar is added to the cream cheese to provide sweetness and help achieve the right texture. The sugar not only sweetens the filling but also contributes to the overall structure of the cheesecake.

To enhance the creamy texture and introduce a slight tang, sour cream is included in the filling. The addition of sour cream gives the cheesecake a luscious mouthfeel while balancing the sweetness of the sugar. The flavor profile is further enriched by adding vanilla extract, which brings warmth and depth to the dessert, and a hint of cocoa powder, which enhances the chocolate notes without overpowering the red velvet flavor.

Eggs play a vital role in providing structure to the cheesecake. They help bind the ingredients together, ensuring that the filling sets properly during baking. The careful incorporation of eggs is key to achieving the right consistency and avoiding a dense texture.

Last but not least, red food coloring is a crucial component in this recipe. It not only gives the cheesecake its signature red hue, making it visually stunning, but it also enhances the festive appeal of the dessert, perfect for special occasions like birthdays, holidays, or anniversaries.

Step-by-Step Preparation

Creating Mini Red Velvet Oreo Cheesecakes is a straightforward process, and with the right guidance, you’ll be able to craft these delightful treats with ease. Below is a detailed guide to ensure clarity and ease as you prepare this delicious dessert.

Preparing the Oreo Crust

1. Crush the Oreo Cookies: Start by gathering about 20 Oreo cookies. Place them in a food processor and pulse until they resemble fine crumbs. If you don’t have a food processor, you can also place the cookies in a zip-top bag and crush them using a rolling pin.

2. Mix with Melted Butter: Once the cookies are finely crushed, transfer them to a mixing bowl. Melt about 5 tablespoons of unsalted butter in the microwave or on the stovetop. Pour the melted butter over the crushed Oreo cookies and mix well until the mixture resembles wet sand.

3. Press into Muffin Tins: Line a muffin tin with cupcake liners for easy removal of the cheesecakes. Using a tablespoon or your fingers, press the Oreo mixture firmly into the bottom of each cupcake liner to form a solid crust. Ensure the crust is evenly distributed and compacted to hold together during baking.

Creating the Cheesecake Filling

1. Beat the Cream Cheese: In a large mixing bowl, use an electric mixer to beat 16 ounces of softened cream cheese until smooth and creamy. This step is crucial for achieving a silky texture, so take your time to ensure there are no lumps.

2. Incorporate the Other Ingredients: Gradually add 1 cup of granulated sugar to the cream cheese, mixing until well combined. Next, add 1/2 cup of sour cream, 1 teaspoon of vanilla extract, and 1 tablespoon of cocoa powder. Mix until everything is fully incorporated.

3. Add the Eggs: Beat in two large eggs one at a time, mixing on low speed after each addition just until combined. It’s important not to overmix the eggs, as this can lead to cracks in the cheesecake once baked. The mixture should be smooth and creamy.

4. Color the Mixture: Finally, add about 1 tablespoon of red food coloring to the cheesecake batter. Stir until the color is evenly distributed, creating a vibrant red hue throughout the filling.

Baking Process

1. Preheat the Oven: Preheat your oven to 325°F (160°C). Properly preheating the oven is essential for ensuring even baking and achieving the right texture for your cheesecakes.

2. Fill the Muffin Tins: Carefully spoon the cheesecake filling over the prepared Oreo crusts, filling each liner about three-quarters full. This allows room for the cheesecakes to rise slightly as they bake.

3. Bake: Place the muffin tin in the preheated oven and bake for about 20-25 minutes, or until the edges are set but the centers are slightly jiggly. This indicates that the cheesecakes are done baking but still creamy in the center.

As you follow these steps, you’ll be well on your way to creating delightful Mini Red Velvet Oreo Cheesecakes that are sure to impress. The combination of the rich crust and luscious filling will leave your taste buds craving more. Stay tuned for the next part of this article, where we will explore cooling, decorating, and serving these scrumptious mini cheesecakes, along with tips for the best results.

Exploring the components of <strong>Mini Red Velvet Oreo Cheesecakes</strong> reveals the thoughtful balance of flavors and textures that make them so special. Each ingredient plays a crucial role in achieving the desired taste and presentation, ensuring that every bite is a delightful experience.” /></p>
</p>
<h3>Guidelines for Filling Muffin Tins</h3>
</p>
<p>When preparing your Mini Red Velvet Oreo Cheesecakes, the way you fill your muffin tins is crucial for ensuring even baking and achieving that perfect texture. Here are some guidelines to help you fill the muffin tins effectively:</p>
</p>
<p>1. <strong>Use a Cookie Scoop or Measuring Spoon</strong>: To maintain uniformity, use a cookie scoop or a measuring spoon to portion out the crust and cheesecake filling. This ensures that each cheesecake has the same amount of filling and crust, leading to consistent results.</p>
</p>
<p>2. <strong>Layering Technique</strong>: Start by adding a tablespoon of the crushed Oreo crust mixture to the bottom of each muffin tin. Gently press it down with the back of a spoon or your fingers to form an even base. Next, carefully spoon the cheesecake batter on top of the crust, filling each cup about 3/4 full. This will allow space for the cheesecakes to rise slightly without overflowing.</p>
</p>
<p>3. <strong>Avoid Overfilling</strong>: While it can be tempting to fill the tins all the way to the top, it’s crucial to leave some room for expansion as the cheesecakes bake. Overfilling can lead to a messy oven and uneven baking.</p>
</p>
<h3>Baking Time and How to Check for Doneness</h3>
</p>
<p>Once your muffin tins are filled, it’s time to bake the cheesecakes. The baking time is typically around 18-20 minutes, but it can vary depending on your oven. Here’s how to check for doneness:</p>
</p>
<p>1. <strong>Visual Cues</strong>: The edges of the cheesecakes should appear set, while the centers may still have a slight jiggle. This is normal as they will continue to firm up while cooling.</p>
</p>
<p>2. <strong>Toothpick Test</strong>: Insert a toothpick into the center of one of the cheesecakes. If it comes out clean or with just a few moist crumbs, your cheesecakes are done. If it comes out wet with batter, give them a few more minutes in the oven.</p>
</p>
<p>3. <strong>Cooling in the Oven</strong>: Once baked, turn off the oven and leave the cheesecakes inside with the door slightly ajar for about 10 minutes. This gradual cooling helps prevent the cheesecakes from cracking.</p>
</p>
<h3>Cooling and Chilling</h3>
</p>
<h4>Why Cooling in the Pan is Essential Before Refrigeration</h4>
</p>
<p>After baking, it’s important to allow the Mini Red Velvet Oreo Cheesecakes to cool in the muffin tin for about 10-15 minutes. This step is critical for several reasons:</p>
</p>
<p>– <strong>Stability</strong>: Cooling in the pan allows the cheesecakes to stabilize and set further, reducing the risk of cracks and ensuring that they maintain their shape when removed from the tins.</p>
</p>
<p>– <strong>Avoiding Condensation</strong>: If you transfer them directly to the refrigerator while still hot, condensation can form, resulting in a watery texture that can affect the final product.</p>
</p>
<h4>The Importance of Chilling the Cheesecakes for Texture and Flavor Development</h4>
</p>
<p>Once the cheesecakes have cooled in the pan, transfer them to a wire rack to cool completely before chilling them in the refrigerator. Chilling for at least 4 hours (or overnight for best results) is essential for several reasons:</p>
</p>
<p>– <strong>Texture Improvement</strong>: Chilling allows the cheesecakes to set completely, resulting in a firmer and creamier texture that melts in your mouth.</p>
</p>
<p>– <strong>Flavor Development</strong>: The flavors of the red velvet cheesecake filling deepen and meld during the chilling process, enhancing the overall taste of the dessert.</p>
</p>
<h3>Decorating Your Mini Cheesecakes</h3>
</p>
<p>Once your Mini Red Velvet Oreo Cheesecakes are chilled and ready to serve, it’s time to elevate their presentation with some creative decorations.</p>
</p>
<h4>Whipped Cream Topping</h4>
</p>
<p>A fluffy layer of homemade whipped cream can add a delightful finish to your mini cheesecakes.</p>
</p>
<p>– <strong>How to Make Homemade Whipped Cream</strong>: In a mixing bowl, combine 1 cup of heavy cream with 2 tablespoons of powdered sugar and a splash of vanilla extract. Using an electric mixer, whip the cream on medium-high speed until soft peaks form. Be careful not to overwhip, as this can turn the cream into butter.</p>
</p>
<p>– <strong>Alternative Topping Suggestions</strong>: For a different flavor profile, consider adding a tablespoon of cocoa powder to the whipped cream for a subtle chocolate flavor, or incorporate a few drops of peppermint extract for a refreshing twist.</p>
</p>
<h4>Garnishing with Oreo Cookies</h4>
</p>
<p>To further enhance the visual appeal and flavor of your cheesecakes, consider garnishing them with Oreo cookies.</p>
</p>
<p>– <strong>Techniques for Decorating with Half Oreo Cookies</strong>: Cut Oreo cookies in half and gently press them into the top of each cheesecake. This not only adds a nice crunch but also reinforces the Oreo flavor in your dessert.</p>
</p>
<p>– <strong>Additional Garnishing Ideas</strong>: Crushed Oreo cookies sprinkled on top add texture, or you might consider drizzling melted white chocolate or dark chocolate over the cheesecakes for an elegant touch. Fresh berries, such as raspberries or strawberries, can also add a pop of color and freshness.</p>
</p>
<h3>Serving Suggestions</h3>
</p>
<p>Presenting and serving your Mini Red Velvet Oreo Cheesecakes is an integral part of the dessert experience. Here are some suggestions to make them shine.</p>
</p>
<h4>Occasions for Serving</h4>
</p>
<p>These mini cheesecakes are perfect for a variety of occasions:</p>
</p>
<p>– <strong>Birthdays</strong>: Their vibrant color and decadent flavor make them an excellent choice for birthday celebrations.</p>
</p>
<p>– <strong>Holidays</strong>: Serve them during festive gatherings, such as Valentine’s Day or Christmas, where their rich red hue can bring a festive touch.</p>
</p>
<p>– <strong>Dinner Parties</strong>: They are a delightful end to any dinner party and can impress guests with their stunning appearance and delicious taste.</p>
</p>
<h4>Pairing Suggestions</h4>
</p>
<p>To enhance the flavor experience, consider pairing these mini cheesecakes with complementary beverages:</p>
</p>
<p>– <strong>Coffee or Espresso</strong>: The rich flavors of coffee pair beautifully with the sweet and creamy cheesecakes.</p>
</p>
<p>– <strong>Milk</strong>: A classic glass of milk balances the sweetness and enhances the flavors of the Oreo crust.</p>
</p>
<p>– <strong>Dessert Wine</strong>: For a more sophisticated pairing, try serving these cheesecakes with a sweet dessert wine or a fruity sparkling wine.</p>
</p>
<h4>Portion Control and Presentation</h4>
</p>
<p>When serving mini cheesecakes, presentation is key:</p>
</p>
<p>– <strong>Visually Appealing Dessert Table</strong>: Arrange the cheesecakes on a decorative platter, using colorful garnishes and different heights for an eye-catching display.</p>
</p>
<p>– <strong>Tips for Transporting to Events</strong>: If you’re taking these treats to a gathering, consider using a cupcake carrier or a sturdy container to keep them secure during transport. Adding a layer of parchment paper between layers can prevent sticking.</p>
</p>
<h3>Nutritional Information</h3>
</p>
<p>Understanding the nutritional profile of your Mini Red Velvet Oreo Cheesecakes can help you enjoy them responsibly.</p>
</p>
<h4>Caloric Content and Nutritional Breakdown</h4>
</p>
<p>Each mini cheesecake typically contains around 150-200 calories, depending on the specific ingredients used. Here’s a breakdown of key nutritional information per serving:</p>
</p>
<p>– <strong>Calories</strong>: Approximately 180</p>
<p>– <strong>Fat</strong>: 10g</p>
<p>– <strong>Carbohydrates</strong>: 22g</p>
<p>– <strong>Protein</strong>: 3g</p>
<p>– <strong>Sugar</strong>: 10g</p>
</p>
<h4>Discussion on Moderation</h4>
</p>
<p>While these treats are delicious, they are best enjoyed in moderation. Incorporating them into a balanced diet means savoring their rich flavors while being mindful of portion sizes.</p>
</p>
<h3>Conclusion</h3>
</p>
<p>Mini Red Velvet Oreo Cheesecakes are not just a feast for the eyes; they are a celebration of flavors and textures that can bring joy to any occasion. The combination of a rich, creamy filling nestled atop a crunchy Oreo crust makes these mini desserts an irresistible choice for both casual gatherings and special celebrations. By following the detailed recipe and preparation guide, anyone can master this delectable treat and impress friends and family with their baking skills. Enjoy the sweet satisfaction that comes with creating and sharing these delightful cheesecakes.</p>
<div id=

Exploring the components of Mini Red Velvet Oreo Cheesecakes reveals the thoughtful balance of flavors and textures that make them so special. Each ingredient plays a crucial role in achieving the desired taste and presentation, ensuring that every bite is a delightful experience.

Mini Red Velvet Oreo Cheesecakes

Treat yourself to a delightful culinary adventure with Mini Red Velvet Oreo Cheesecakes! These charming mini desserts combine the rich, creamy texture of cheesecake with the whimsical flair of red velvet and a crunchy Oreo crust. Perfect for any celebration or a sweet indulgence at home, these cheesecakes will impress dessert lovers with their vibrant color and luscious flavors. Explore this comprehensive guide to create your own irresistible mini cheesecakes! #Dessert #Baking #RedVelvet #Cheesecake #Oreo #SweetTreats #MiniDesserts #PartyFood #Yummy

Ingredients
  

1 package (about 16) Oreo cookies, crushed

2 tablespoons unsalted butter, melted

1 package (8 oz) cream cheese, softened

1/2 cup granulated sugar

1/2 cup sour cream

1 teaspoon vanilla extract

1 teaspoon cocoa powder

2 large eggs

1 tablespoon red food coloring

Whipped cream (for topping)

Additional Oreo cookies (for decoration)

Instructions
 

Preheat the oven to 325°F (160°C).

    In a medium bowl, combine the crushed Oreo cookies and melted butter until well combined.

      Press the Oreo mixture firmly into the bottom of a muffin tin lined with cupcake liners to form the crust.

        In a large mixing bowl, beat together the cream cheese and sugar until smooth and creamy.

          Add the sour cream, vanilla extract, cocoa powder, eggs, and red food coloring into the cream cheese mixture. Mix until fully incorporated.

            Spoon the cheesecake batter over the Oreo crust in the muffin tin, filling each cup about 2/3 full.

              Bake in the preheated oven for about 20-25 minutes, until the edges are set but the centers are still slightly jiggly.

                Allow the cheesecakes to cool completely in the pan, then refrigerate for at least 2 hours.

                  Top each mini cheesecake with whipped cream and a half Oreo cookie for decoration before serving.

                    Prep Time: 15 minutes | Total Time: 3 hours (including chill time) | Servings: 12 mini cheesecakes

                      Leave a Comment

                      Recipe Rating