Indulging in a slice of Chocolate Cream Pie Delight is a heavenly experience that combines rich chocolate flavor with a smooth, creamy texture. This dessert is perfect for any occasion, whether you are celebrating a special event or simply treating yourself to a delicious homemade treat. In this article, we will explore the origins of chocolate cream pie, break down the essential ingredients, and guide you through the step-by-step instructions to create this delicious dessert. You’ll also find variations and serving suggestions to enhance your baking experience, ensuring that your chocolate cream pie is not just a dessert, but a show-stopping delight.
The Allure of Chocolate Cream Pie
The allure of chocolate cream pie lies in its perfect balance of flavors and textures. The creamy filling, paired with a comforting crust, creates a dessert that is both satisfying and indulgent. But where did this delightful dessert originate?
Brief History of Chocolate Cream Pie
Chocolate cream pie has a rich history that dates back to the late 19th century in America. Cream pies, which typically feature a filling made from a custard-like mixture, were popularized in the United States during this time. The chocolate variant emerged shortly thereafter, delighting taste buds with its rich and velvety texture. By the early 20th century, chocolate cream pie became a staple in American households, often gracing tables during family gatherings, holiday celebrations, and potluck dinners. Its popularity has only grown, making it a beloved dessert across generations.
Why Chocolate Cream Pie is a Favorite Dessert
One reason chocolate cream pie remains a favorite is its versatility. It can be enjoyed year-round, whether served chilled in the summer or warmed slightly in the winter. The combination of creamy chocolate filling and a flaky crust offers an irresistible contrast that appeals to chocolate lovers and dessert enthusiasts alike. Additionally, the dessert is easy to customize, allowing bakers to experiment with different flavors, toppings, and variations to suit their preferences.
The Perfect Occasions to Serve Chocolate Cream Pie
Chocolate cream pie is suitable for a variety of occasions. It can be the centerpiece of a birthday celebration, a delicious end to a holiday meal, or simply a comforting treat at the end of a long day. Its rich flavor makes it a hit at family gatherings and potlucks, while its elegant presentation makes it appropriate for more formal events. Whether you’re hosting a casual dinner party or a festive holiday feast, chocolate cream pie is sure to delight your guests and leave them asking for seconds.
Key Ingredients for Chocolate Cream Pie Delight
Creating the perfect chocolate cream pie requires a selection of high-quality ingredients that work together to create a rich and satisfying dessert. Below is an overview of the essential ingredients needed to make Chocolate Cream Pie Delight, along with some tips on selecting the best options for your pie.
Overview of Essential Ingredients
1. Pre-baked Pie Crust: The foundation of any great pie is its crust. For chocolate cream pie, you can choose between a store-bought or homemade crust, depending on your time and skill level.
2. Heavy Whipping Cream: This is essential for making the filling creamy and luxurious. It adds richness and a smooth texture that elevates the pie.
3. Granulated Sugar: Sugar helps to balance the rich flavors of the chocolate and provides the necessary sweetness to the filling.
4. Unsweetened Cocoa Powder: This ingredient is crucial for imparting that deep chocolate flavor that chocolate cream pie is known for.
5. Vanilla Extract: A small amount of vanilla extract enhances the chocolate flavor and adds depth to the filling.
6. Egg Yolks: Egg yolks provide creaminess and structure to the filling, helping it set properly.
7. Cornstarch: This thickening agent is essential for achieving the right consistency in the filling.
8. Whole Milk: Whole milk contributes to the creamy base of the filling and balances the richness of the heavy cream.
9. Semi-Sweet Chocolate Chips: Adding chocolate chips enhances the overall chocolate flavor and provides a delightful texture.
10. Whipped Cream and Chocolate Shavings: These are the perfect toppings that not only add visual appeal but also extra indulgence to the finished pie.
Pre-baked Pie Crust: Store-bought vs. Homemade
When it comes to the pie crust, you have the option to either purchase a pre-baked crust or make your own from scratch. A store-bought crust can save you time and effort, making it a convenient choice for busy bakers. However, if you want to impress your guests with a truly homemade dessert, a homemade pie crust can elevate your chocolate cream pie to the next level.
If you choose to make your own crust, aim for a flaky and buttery texture that complements the rich chocolate filling. This can be achieved by using cold butter and minimal handling of the dough to prevent it from becoming tough. Regardless of your choice, ensure that the crust is pre-baked to achieve a crisp texture that holds up against the filling.
Heavy Whipping Cream: The Foundation of Creaminess
The heavy whipping cream is a key component of the filling. Its high-fat content contributes to the creaminess and luscious mouthfeel of the pie. When selecting heavy whipping cream, opt for a high-quality brand that contains no additives. This will ensure that your chocolate cream pie has a rich and satisfying texture.
Granulated Sugar: Balancing Sweetness
Granulated sugar is essential for sweetening the pie filling. The amount of sugar can be adjusted based on your taste preference and the sweetness of the chocolate you are using. Remember that the filling will set and taste slightly less sweet once it is chilled, so it is important to achieve a good balance of sweetness during preparation.
Unsweetened Cocoa Powder: The Rich Chocolate Flavor
To achieve the deep and intense chocolate flavor that chocolate cream pie is known for, use high-quality unsweetened cocoa powder. Look for a cocoa powder that is rich and aromatic, as this will significantly enhance the overall flavor of the pie. It’s worth investing in a premium cocoa powder for the best results.
Vanilla Extract: Enhancing the Chocolate
A dash of vanilla extract is a simple yet effective way to elevate the flavor profile of your chocolate cream pie. The warmth of vanilla complements the chocolate and adds a layer of complexity to the filling. Be sure to use pure vanilla extract for the best flavor; imitation vanilla can have a synthetic taste that may detract from the overall experience.
Egg Yolks: For Creaminess and Structure
Egg yolks play a crucial role in the texture and stability of the filling. They create a custard-like consistency, ensuring that the pie sets properly while providing a creamy mouthfeel. When using egg yolks, it’s important to temper them by gradually adding the hot mixture to the yolks to prevent curdling. This step is vital for a smooth and velvety filling.
Cornstarch: Thickening Agent for the Filling
Cornstarch acts as a thickening agent that helps the filling set perfectly. It provides the necessary structure and creaminess to the pie without adding any additional flavors. When combined with the egg yolks, cornstarch ensures your chocolate cream pie has a stable and luscious filling.
Whole Milk: The Creamy Base
Whole milk contributes to the creaminess and flavor of the filling. It works in conjunction with the heavy cream to create a rich texture that is not overly heavy. Using whole milk ensures that your pie filling remains smooth and silky, allowing for a delightful eating experience.
Semi-Sweet Chocolate Chips: Extra Chocolate Goodness
For an added chocolatey punch, semi-sweet chocolate chips can be melted and folded into the filling. They provide extra richness and a delightful texture, further enhancing the overall chocolate experience. Choose high-quality chocolate chips for the best results, as the flavor of the chocolate will shine through in the finished pie.
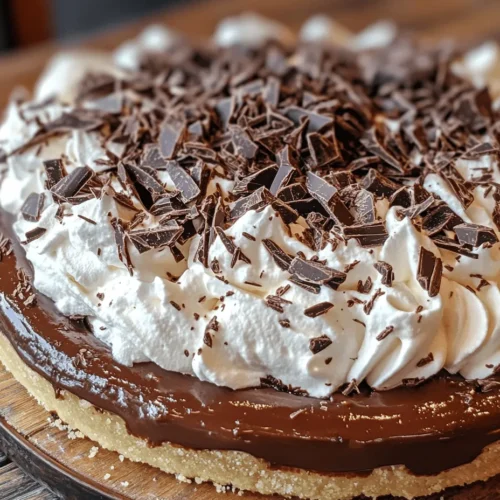
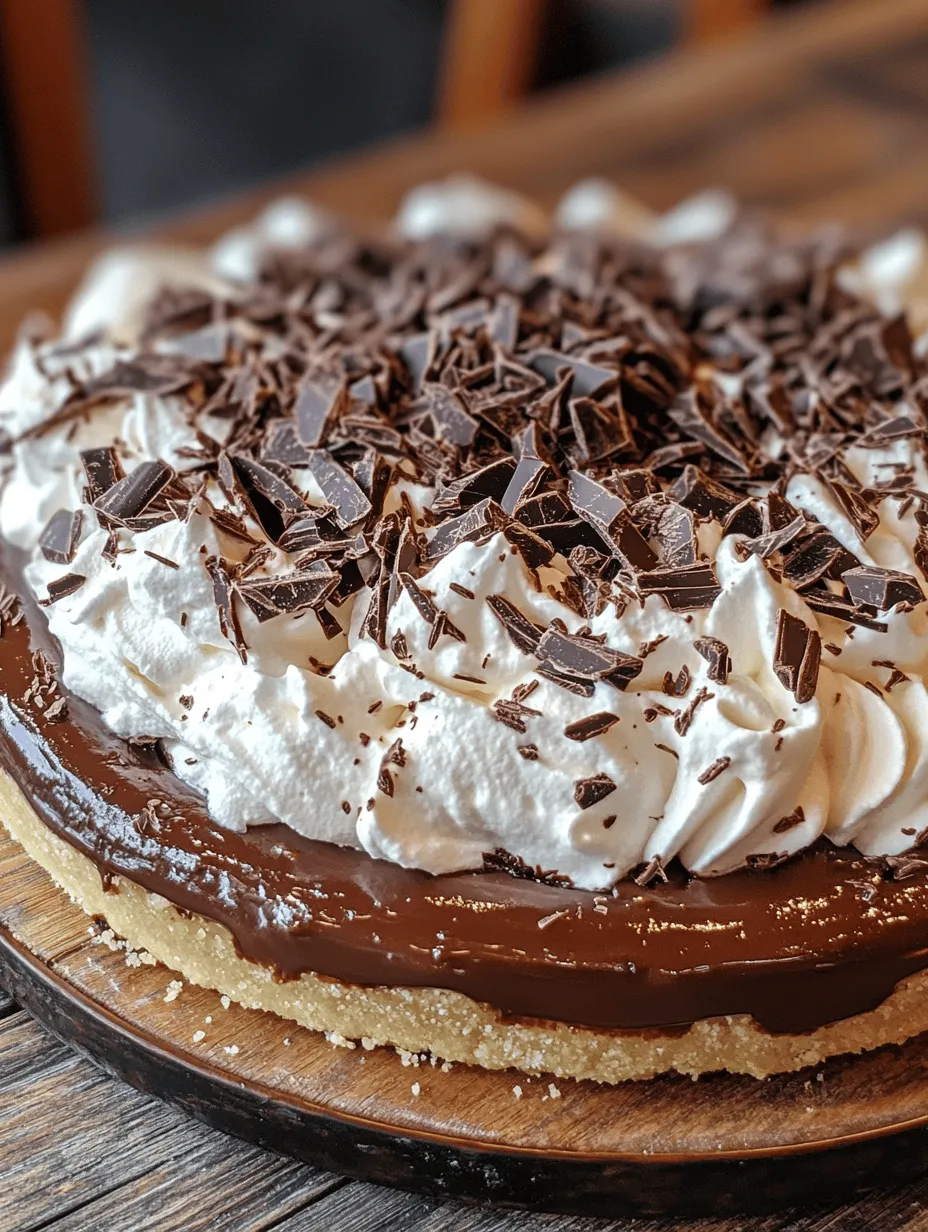
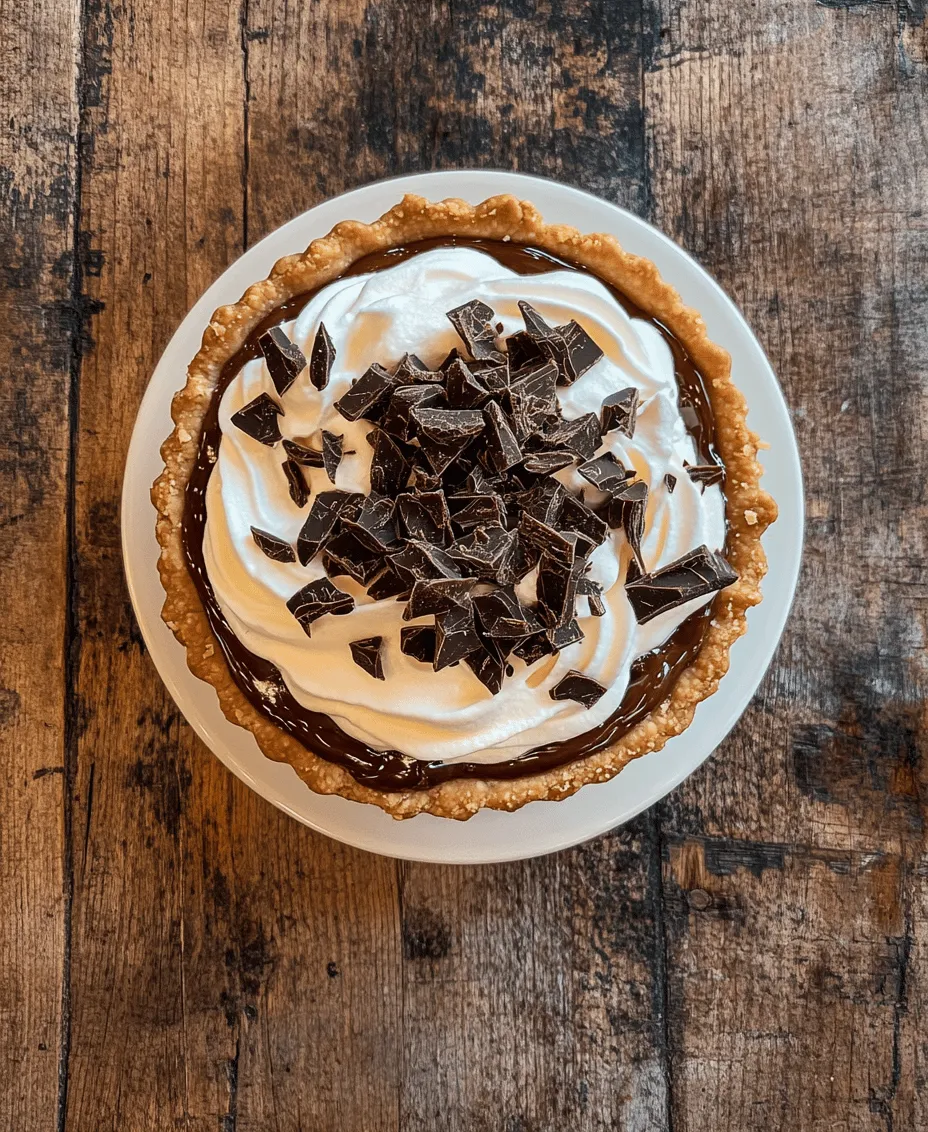
Whipped Cream and Chocolate Shavings: The Perfect Toppings
To finish your Chocolate Cream Pie Delight, don’t forget the toppings! A generous layer of whipped cream adds a light and airy texture that contrasts beautifully with the rich filling. For an elegant touch, garnish with chocolate shavings or curls, which will not only look appealing but also provide a delightful crunch.
Step-by-Step Instructions for Making Chocolate Cream Pie Delight
Now that we’ve covered the essential ingredients, let’s dive into the step-by-step instructions for making your own Chocolate Cream Pie Delight. Following these instructions will help you create a stunning and delicious dessert that is sure to impress.
Preparing the Pie Crust
The first step in making your chocolate cream pie is to prepare the pie crust. If you are using a pre-baked store-bought crust, simply remove it from the packaging and set it aside. If you’re making your own crust, follow these steps:
1. Make the Dough: In a mixing bowl, combine flour, salt, and cold butter. Use a pastry cutter or your fingertips to work the butter into the flour until the mixture resembles coarse crumbs.
2. Add Water: Gradually add ice water, one tablespoon at a time, mixing until the dough comes together. Be careful not to overwork the dough.
3. Chill the Dough: Form the dough into a disk, wrap it in plastic wrap, and refrigerate for at least 30 minutes. This will help the gluten relax and result in a flakier crust.
4. Roll Out the Dough: Once chilled, roll out the dough on a lightly floured surface to about 1/8 inch thick. Carefully transfer it to a pie dish, trimming any excess dough hanging over the edges.
5. Pre-bake the Crust: Preheat your oven to 375°F (190°C). Line the crust with parchment paper and fill it with pie weights or dried beans to prevent it from puffing up. Bake for about 15-20 minutes, or until the edges are lightly golden. Remove the parchment and weights, and bake for an additional 5 minutes to ensure the bottom is cooked through. Allow it to cool completely.
Importance of a Pre-Baked Crust
Pre-baking the crust is essential for ensuring that your chocolate cream pie has a crisp and flaky base. A raw crust may become soggy when filled with the creamy chocolate filling. By fully cooking the crust beforehand, you prevent this issue and create a delightful texture contrast with the filling.
Tips for Achieving a Flaky Crust
To achieve the perfect flaky pie crust, consider the following tips:
– Use Cold Ingredients: Ensure your butter and water are cold. This helps create a flaky texture by preventing the fat from fully incorporating into the flour.
– Don’t Overwork the Dough: Mixing the dough too much can lead to a tough crust. Handle the dough gently, and stop mixing as soon as it comes together.
– Chill the Dough: Allowing the dough to chill before rolling helps to relax the gluten, which results in a more tender crust.
Making the Chocolate Filling
Now that your crust is ready, it’s time to prepare the luscious chocolate filling. Follow these step-by-step instructions to create a filling that is rich, creamy, and full of chocolate flavor.
1. Combine Dry Ingredients: In a medium saucepan, whisk together the granulated sugar, unsweetened cocoa powder, and cornstarch. This dry mixture forms the base of your filling.
2. Add Wet Ingredients: Gradually add in the whole milk and heavy whipping cream while whisking to combine. This will prevent lumps from forming and create a smooth mixture.
3. Cook the Mixture: Place the saucepan over medium heat, stirring constantly until the mixture thickens and begins to bubble. This should take about 5-7 minutes.
4. Temper the Egg Yolks: In a separate bowl, whisk the egg yolks. To prevent them from curdling, slowly add a few spoonfuls of the hot chocolate mixture to the yolks, whisking constantly. This process is known as tempering and ensures a smooth filling.
5. Combine and Cook Again: Pour the tempered egg yolk mixture back into the saucepan with the chocolate mixture. Continue to cook over medium heat, stirring constantly, until the filling thickens further and reaches a custard-like consistency.
6. Add Chocolate Chips and Vanilla: Remove the saucepan from heat and stir in the semi-sweet chocolate chips and vanilla extract. Mix until the chocolate is fully melted and the filling is smooth.
7. Cool the Filling: Allow the filling to cool for a few minutes before pouring it into the pre-baked pie crust. This will help prevent the crust from becoming soggy.
By following these instructions, you will create a rich and decadent chocolate filling that perfectly complements the flaky crust. Stay tuned for the next part of this article, where we will discuss how to assemble your pie, add the finishing touches, and explore some delicious variations and serving suggestions.
Heating the Milk Mixture: Key Points to Remember
To create the perfect chocolate cream filling for your Chocolate Cream Pie Delight, heating the milk mixture correctly is crucial. Begin by pouring your milk into a medium-sized saucepan. Place the saucepan over medium heat and allow the milk to warm gradually. It is essential to stir the milk occasionally to prevent it from scorching on the bottom. Look for small bubbles to form around the edges, which indicates that the milk is heating up without reaching a boil.
Use a thermometer to monitor the temperature, aiming for around 180°F (82°C). This temperature is ideal for infusing flavors without curdling your mixture. Once the milk has reached the appropriate temperature, remove it from the heat and let it cool slightly before proceeding to the next step.
Tempering the Eggs: Techniques for Success
Tempering the eggs is a vital step that ensures a smooth and creamy filling, preventing the eggs from scrambling when combined with the hot milk. Begin by whisking your egg yolks in a separate bowl until they are smooth and slightly lightened in color.
Once the milk is heated and has cooled slightly, pour a small amount of the warm milk into the bowl with the egg yolks while whisking continuously. This process gradually raises the temperature of the yolks without cooking them. Repeat this process by adding another small amount of milk, continuing to whisk vigorously. This will allow the yolks to reach the same temperature as the milk mixture without scrambling.
After tempering the yolks, pour the entire mixture back into the saucepan with the remaining milk and whisk to combine thoroughly.
Thickening the Mixture: Consistency and Texture
With the combined milk and tempered egg mixture back on the heat, it’s time to thicken the filling. Cook the mixture over medium heat, stirring constantly with a wooden spoon or silicone spatula. This continuous stirring is crucial to avoid lumps and ensure even cooking.
As the mixture heats, you will notice it starting to thicken. Continue cooking until it reaches a pudding-like consistency, about 5 to 7 minutes. You can check the thickness by dipping the back of your spoon into the mixture; if it coats the spoon and holds a line when you run your finger through it, it’s ready.
Be cautious not to overcook, as this can lead to a grainy texture. Once thickened, remove the saucepan from the heat and proceed to the next step.
Adding Chocolate Chips and Vanilla: Creating a Luxurious Filling
To create a rich, chocolatey flavor, add your semi-sweet chocolate chips to the hot thickened mixture. Stir the chocolate chips in until they are completely melted and fully incorporated into the mixture.
Next, add a teaspoon of pure vanilla extract to enhance the flavor profile. This combination of chocolate and vanilla creates a luxurious filling that is both decadent and satisfying. Ensure that the filling is smooth and glossy before moving on to the assembly stage.
Assembling the Pie
With your chocolate filling prepared and cooled slightly, it’s time to assemble your Chocolate Cream Pie Delight. If you haven’t yet prepared your pie crust, now is the time to do so. Whether you opted for a store-bought pie crust or made your own from scratch, ensure that it is baked and cooled completely.
Pour the warm chocolate filling into the cooled pie crust, spreading it evenly with a spatula to ensure an even layer. Make sure to tap the pie pan gently against the counter to release any air bubbles trapped in the filling. This helps achieve a smooth surface and a more appealing final product.
Pouring and Smoothing the Filling
As you pour the filling into the crust, take care to do so slowly and steadily to prevent overflow. Once the filling is in the crust, use an offset spatula to gently smooth the top. This step is crucial for achieving that perfect finish, as a smooth surface will not only look appealing but also allow for an even whipped cream topping later.
Refrigeration: Importance of Setting Time
After smoothing the filling, cover the pie with plastic wrap or aluminum foil, ensuring it does not touch the surface of the filling. Refrigerate the pie for at least 4 hours, though overnight is best for optimal setting. This time allows the filling to firm up and develop its flavors fully. Patience is key here, as the longer it sets, the better the texture and taste will be.
Preparing the Whipped Cream Topping
While the pie is chilling, you can prepare the whipped cream topping. In a large mixing bowl, combine heavy cream, powdered sugar, and a splash of vanilla extract. Using an electric mixer, beat the mixture on medium speed until soft peaks form. This typically takes about 3 to 5 minutes.
Be cautious not to over-mix, as this can turn the cream into butter. The goal is to achieve a light, fluffy texture that complements the rich chocolate filling.
Techniques for Perfectly Whipped Cream
For perfectly whipped cream, ensure that your mixing bowl and beaters are chilled prior to whipping. This helps the cream whip more effectively and will hold its shape better once beaten. Additionally, you can use a stabilized whipped cream recipe by adding a small amount of gelatin or cream cheese if you prefer a topping that holds its shape for longer.
Spreading the Cream for Presentation
Once your pie is fully set and the whipped cream is ready, it’s time to top the pie. Use an offset spatula or a large spoon to carefully spread the whipped cream over the chocolate filling. Aim for a generous layer, creating soft peaks and swirls for an elegant presentation.
For an added touch, consider piping the whipped cream into decorative swirls or rosettes around the edges of the pie.
Serving and Presentation Ideas
With your Chocolate Cream Pie Delight beautifully assembled, it’s time to serve. To slice the pie, use a sharp knife dipped in hot water for clean cuts. Wipe the knife with a paper towel between slices to keep the edges neat.
How to Slice and Serve the Pie
When serving, consider placing each slice on a chilled dessert plate to enhance the overall experience. This small detail elevates the presentation and adds a touch of sophistication to your dessert.
Creative Garnishing Techniques with Chocolate Shavings
For a finishing touch, garnish each slice with chocolate shavings or curls. You can create these by using a vegetable peeler on a bar of chocolate or by using a box grater for a more rustic look. A sprinkle of cocoa powder or chocolate sprinkles can also add visual appeal.
Ideal Pairings: Beverages and Other Desserts
Pair your Chocolate Cream Pie Delight with a glass of ice-cold milk, coffee, or a rich red wine like Cabernet Sauvignon. For those who love dessert pairings, consider serving it alongside a scoop of vanilla or coffee ice cream for an indulgent treat.
Variations on the Classic Chocolate Cream Pie
While the classic Chocolate Cream Pie Delight is a crowd-pleaser, don’t hesitate to experiment with variations that cater to different tastes.
Adding Flavor: Mint, Coffee, or Orange Zest
For a refreshing twist, consider adding a few drops of peppermint extract or espresso powder to the chocolate filling. Alternatively, incorporating a hint of orange zest can enhance the chocolate flavor, adding a bright note that balances the richness.
Alternative Toppings: Fresh Berries or Nutty Crunch
Instead of whipped cream, consider topping your pie with fresh berries such as raspberries or strawberries for a fruity contrast. Alternatively, a sprinkle of toasted nuts can add a delightful crunch and additional flavor complexity.
Gluten-Free Options: Using Almond or Coconut Flour Crust
For those with gluten sensitivities or preferences, you can easily adapt this recipe by using a gluten-free crust made from almond or coconut flour. These alternatives provide a unique flavor while maintaining the pie’s delightful texture.
Nutritional Information and Dietary Considerations
Understanding the nutritional profile of your Chocolate Cream Pie Delight can help you make informed choices. A typical slice (1/8 of the pie) contains approximately:
– Calories: 320
– Fat: 22g
– Saturated Fat: 12g
– Carbohydrates: 30g
– Sugar: 15g
– Protein: 4g
Possible Ingredient Substitutions for Healthier Options
If you seek to make a healthier version, consider using low-fat milk or alternative milk options, such as almond or oat milk. You can also replace granulated sugar with a natural sweetener like maple syrup or coconut sugar.
Allergen Considerations: Dairy and Gluten-Free Alternatives
When preparing this pie, be mindful of allergens. For a dairy-free version, substitute heavy cream with coconut cream and use dairy-free chocolate chips. Always check labels to ensure that your alternative ingredients meet dietary needs.
Conclusion
Chocolate Cream Pie Delight is not just a dessert; it is an experience that brings joy and satisfaction to those who enjoy it. With its rich flavors and creamy texture, this pie stands out as a timeless classic that can easily be adapted to fit various tastes and dietary needs. Whether you are a seasoned baker or a novice in the kitchen, this recipe provides a straightforward guide to creating a delicious masterpiece. Embrace your inner baker and enjoy the delightful process of making this exquisite pie!