Introduction
The Easy No Bake Banana Split Cake is a delightful dessert that captures the essence of classic banana splits in a simple, no-fuss format. This dessert conjures up nostalgia for many, evoking memories of summer picnics, birthday parties, and family gatherings. The layers of creamy goodness, fresh fruit, and delightful crunch make it a favorite among both children and adults alike.
What makes this recipe truly special is its simplicity. No-bake desserts have surged in popularity, especially for those looking to create sweet treats without the hassle of heating up the oven. As families gather for celebrations, this no-bake banana split cake stands out as a crowd-pleaser, ensuring that everyone can enjoy a slice of happiness, regardless of their baking skills.
Creating this dessert is a fun and engaging activity for all ages. Kids love the vibrant colors and flavors of banana splits, and they’ll enjoy helping assemble the layers of this cake. It’s an opportunity to bond over a shared culinary experience while teaching them about ingredients and food presentation. So, let’s dive into this easy recipe that is sure to become a staple at your next gathering!
Understanding the Appeal of No-Bake Desserts
No-bake desserts have a unique allure that resonates with both novice and seasoned home bakers. The convenience of these recipes cannot be overstated. Without the need for baking, they save time and reduce the complexity often associated with traditional desserts. This is particularly beneficial for busy weeknights, impromptu gatherings, or for those who simply want to avoid the heat of the kitchen during warmer months.
One of the most significant advantages of no-bake desserts is their flexibility. They can be prepared in advance, allowing for easy planning when hosting events. These desserts often require minimal ingredients and can be adapted based on what you have on hand. The versatility extends across seasons too; whether it’s a refreshing summer treat or a cozy winter indulgence, there’s a no-bake recipe to suit every occasion.
Moreover, the lack of baking opens the door for creativity. You can mix and match flavors, add various toppings, or even create themed versions of your favorite desserts. The Easy No Bake Banana Split Cake exemplifies this versatility, offering a familiar yet customizable treat that can be enjoyed any time of year.
Ingredients Breakdown for Easy No Bake Banana Split Cake
Before diving into the preparation, let’s take a closer look at the ingredients that make this Easy No Bake Banana Split Cake so irresistible. Each component plays a vital role in achieving the cake’s signature flavor and texture.
Ripe Bananas
The foundation of this dessert is ripe bananas. When selecting bananas for this recipe, it’s essential to choose ones that are just the right stage of ripeness. Overripe bananas, with their naturally sweet flavor and creamy texture, are perfect for this cake. They not only contribute sweetness but also create a smooth, luscious layer in the dessert.
Nilla Wafers or Graham Crackers
For the base of our cake, you can use either Nilla wafers or graham crackers. Nilla wafers bring a classic flavor that pairs beautifully with bananas and cream, while graham crackers offer a slightly different texture and taste. Both options provide a crunchy contrast to the creamy layers above, making them an essential part of this dessert’s structure.
Heavy Whipping Cream
Heavy whipping cream is the secret ingredient that gives this dessert its light and fluffy texture. When whipped, it adds volume and creates a creamy layer that complements the other ingredients. Using heavy cream ensures that your cake has a rich mouthfeel that balances the sweetness of the other components.
Powdered Sugar
Powdered sugar enhances the sweetness of the whipped cream without adding any graininess. It dissolves easily, ensuring a smooth and creamy texture. Adjusting the amount of powdered sugar can help you achieve the perfect level of sweetness to suit your taste.
Cream Cheese
Cream cheese adds a delightful tanginess to the cake, balancing the sweetness from the bananas and sugar. Its creamy consistency blends seamlessly with the whipped cream to create a rich filling that is indulgent yet not overly sweet.
Pineapple Chunks
Pineapple chunks bring a refreshing tropical note to the dessert. Their juicy sweetness complements the bananas perfectly while adding a burst of flavor that enhances the overall experience. Opt for canned pineapple chunks in juice or fresh pineapple for an extra zing.
Strawberries
Fresh strawberries not only add a seasonal appeal but also provide a vibrant visual contrast that makes the cake more inviting. Their bright red color and sweet flavor pair wonderfully with the other ingredients, making them a must-have in this recipe.
Chocolate Syrup
No banana split is complete without chocolate syrup! This ingredient adds the quintessential flavor that ties the dessert together. Drizzling chocolate syrup over the layers not only enhances the taste but also adds an appealing presentation.
Chopped Nuts
For those who enjoy a bit of crunch, chopped nuts are an optional ingredient that can elevate the dessert further. Pecans or walnuts offer a nutty flavor that complements the sweetness of the cake and adds an interesting texture.
Maraschino Cherries
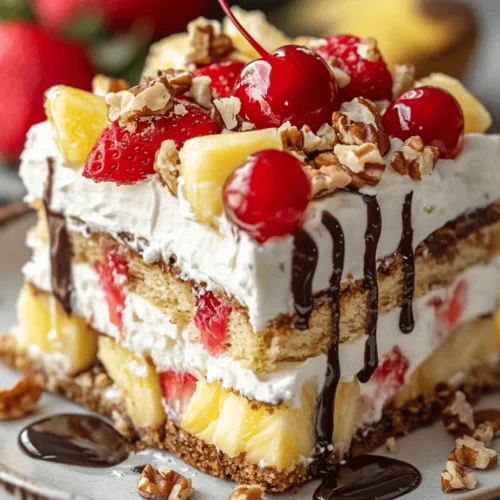
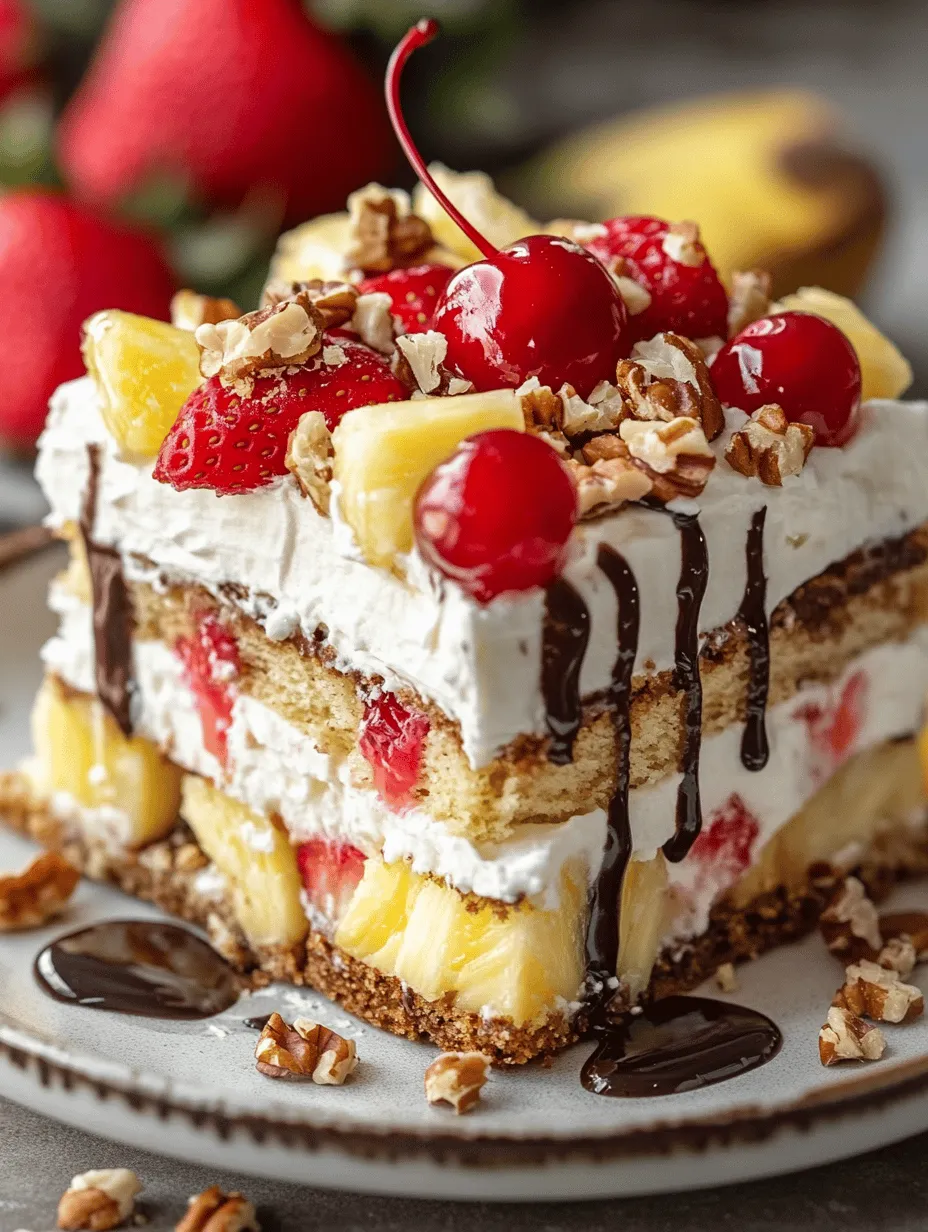
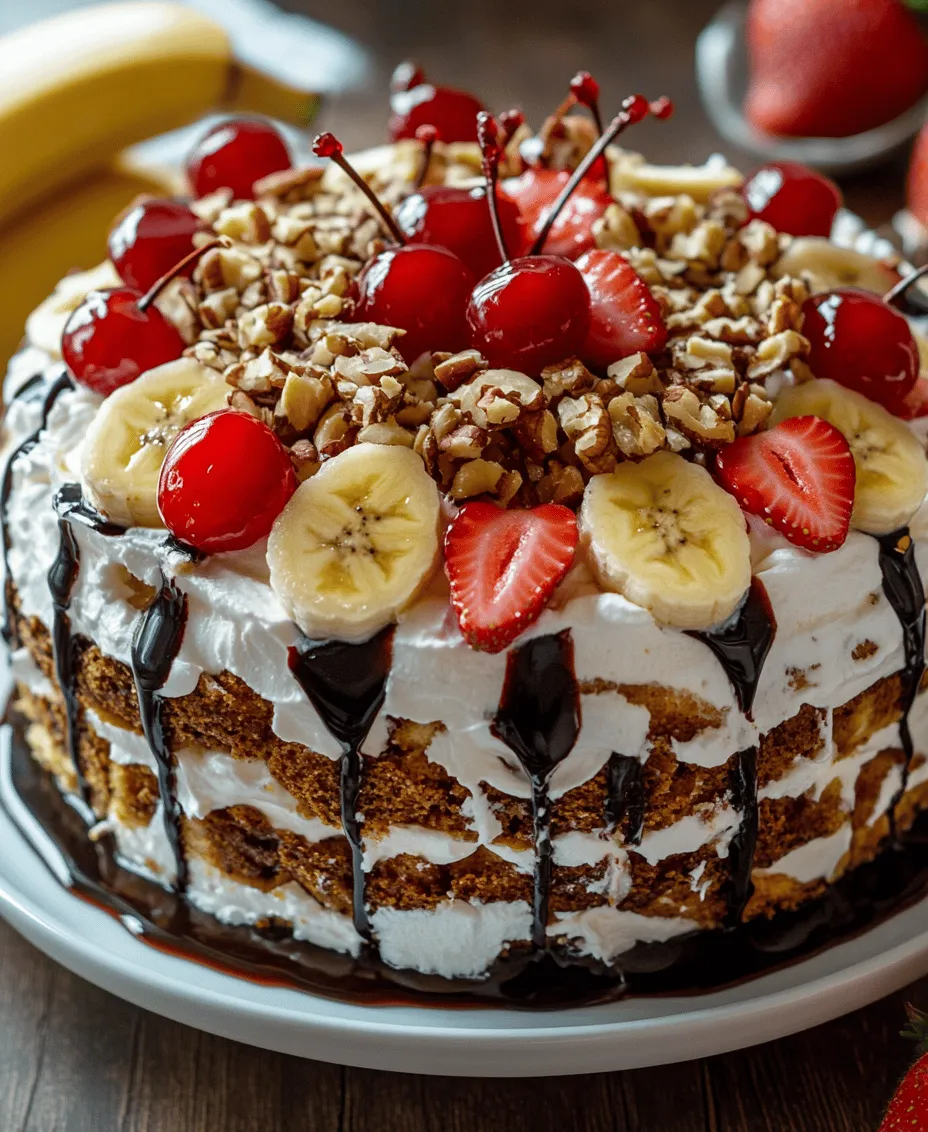
Finally, we can’t forget the traditional maraschino cherries! These bright red cherries are the perfect finishing touch, adding a pop of color and a sweet, tangy flavor that completes the banana split experience. They make for a delightful garnish on top of each slice.
Step-by-Step Instructions for Preparation
Now that we have a clear understanding of the ingredients, let’s move on to the preparation of this delicious Easy No Bake Banana Split Cake. The following steps will guide you through the process, ensuring that your dessert turns out perfectly every time.
Step 1: Gather Your Ingredients
Start by gathering all the necessary ingredients listed above. Make sure you have ripe bananas, Nilla wafers or graham crackers, heavy whipping cream, powdered sugar, cream cheese, pineapple chunks, strawberries, chocolate syrup, chopped nuts, and maraschino cherries ready at hand.
Step 2: Prepare the Base Layer
In a medium bowl, crush the Nilla wafers or graham crackers until they resemble fine crumbs. You can use a food processor for this step to make it quicker, or place them in a zip-top bag and crush them using a rolling pin if you prefer a hands-on approach.
Once crushed, transfer the crumbs to a mixing bowl and add melted butter to bind them together. Stir until the crumbs are evenly coated and resemble wet sand.
Step 3: Form the Crust
Next, prepare a 9×13-inch baking dish. Press the crumb mixture into the bottom of the dish to create an even layer. Use the back of a measuring cup or your fingers to ensure the crust is compact. This base will provide a sturdy foundation for the layers above.
Step 4: Whip the Cream
In a separate large bowl, pour in the heavy whipping cream. Using a hand mixer or stand mixer, whip the cream on medium-high speed until soft peaks form. Gradually add the powdered sugar while continuing to whip until stiff peaks form. This should take about 3-5 minutes.
Step 5: Combine Cream Cheese and Whipped Cream
In another bowl, beat the cream cheese until smooth. You can use an electric mixer or a whisk for this step. Once smooth, gently fold in one-third of the whipped cream into the cream cheese mixture to lighten it. Then, carefully fold in the remaining whipped cream until fully combined. This will create a fluffy and creamy filling for your cake.
Step 6: Layer the Filling
Now it’s time to assemble the cake! Start by spreading half of the cream cheese and whipped cream mixture over the crust in the baking dish. Smooth it out evenly with a spatula.
Next, layer the sliced ripe bananas over the whipped cream mixture, followed by a layer of pineapple chunks. Top this with the remaining cream mixture, smoothing it out once again.
Step 7: Add the Toppings
For the finishing touches, drizzle chocolate syrup over the top layer of the cake. If you’re using chopped nuts, sprinkle them on alongside the syrup. Finally, arrange the fresh strawberries and maraschino cherries on top to create a visually stunning dessert.
Step 8: Chill the Cake
Cover the dish with plastic wrap or aluminum foil and refrigerate the cake for at least 4 hours, or overnight if possible. Chilling allows the flavors to meld together and helps the cake set properly, making it easier to slice.
By following these steps, you’ll have a delicious Easy No Bake Banana Split Cake ready to impress your family and friends. Stay tuned for the next section, where we’ll explore tips for achieving the best results and answer some common questions about this delightful dessert!
Easy No Bake Banana Split Cake Recipe
Preparation Steps
Creating the perfect No Bake Banana Split Cake is all about mastering a few simple techniques. Follow these clear steps to ensure you achieve a dessert that is not only delicious but visually stunning.
Whipping Cream to the Perfect Consistency
Start by whipping the cream. Use a chilled mixing bowl and beaters to create the ideal environment. This helps the cream whip faster and achieve better volume. Pour 2 cups of heavy whipping cream into the bowl and begin mixing on medium speed.
As it thickens (you’ll notice it starting to double in volume), increase the speed to high. You’re aiming for soft peaks, where the cream holds its shape but is still slightly floppy. This stage is crucial; overwhipping can turn your cream into butter.
Blending Cream Cheese and Incorporating Whipped Cream
In a separate mixing bowl, beat 8 ounces of softened cream cheese until smooth. It’s essential that the cream cheese is at room temperature to avoid lumps. Gradually add 1 cup of powdered sugar and 1 teaspoon of vanilla extract, mixing until well combined.
Now, gently fold in the whipped cream you prepared earlier. Use a spatula to cut through the mixture and lift it from the bottom, carefully incorporating the cream without deflating it. The goal is to maintain that light and airy texture, which is what makes this cake so delightful.
Layering Techniques for an Aesthetically Pleasing Dessert
Layering is where the magic happens. Start with a base layer in a rectangular baking dish or a 9×13-inch pan. Use crushed graham crackers or Nilla wafers as your crust. Spread a thin layer of the cream cheese mixture on top, smoothing it out evenly.
Next, add a layer of sliced bananas. This is where you want to ensure even distribution, so take care to spread them out in a single layer. Follow this with another layer of whipped cream mixture, then a sprinkle of crushed pineapple, followed by more bananas.
Repeat this process until you’ve used all your ingredients, finishing with the whipped cream layer on top. For a beautiful presentation, consider decorating the final layer with a drizzle of chocolate syrup, crushed nuts, or maraschino cherries.
Tips for Ensuring Even Distribution of Layers and Toppings
To achieve a professional look, use an offset spatula to spread layers evenly. Make sure that each layer is roughly the same thickness. This not only helps with aesthetics but ensures that every bite contains a balanced mix of flavors.
Visual cues are vital during this process. Look for soft peaks in your whipped cream; this indicates it’s ready to be folded into the cream cheese mixture. When layering, aim for an even spread across the entire surface, which avoids having one side overloaded with toppings.
Layering the Ingredients for Maximum Flavor and Texture
Each layer in your No Bake Banana Split Cake serves a purpose. The graham cracker crust provides a crunchy base that contrasts beautifully with the creamy layers above. The bananas add natural sweetness and prevent the dessert from becoming overly rich, while the cream cheese and whipped cream mixture offers a smooth, decadent texture.
Importance of Each Layer in Contributing to the Overall Experience
The layering not only enhances the visual appeal but also plays a crucial role in flavor development. As the cake chills, the flavors meld together beautifully. The sweetness of the bananas infuses into the cream, and the graham cracker layer softens slightly, making each bite a harmonious blend of textures and tastes.
Suggestions for Variations in Layering
Feel free to get creative with your layers! Consider adding different fruits such as strawberries or blueberries for a twist. You could also incorporate flavored extracts—like almond or coconut—into your cream cheese mixture for an added depth of flavor. For a more decadent treat, drizzling caramel sauce between layers can elevate the overall dessert experience.
Chilling and Setting the Cake
Chilling is a critical part of making the No Bake Banana Split Cake. It allows the flavors to meld and the structure to set, making it easier to slice and serve.
Importance of Chilling Time for Flavor Development and Texture Setting
After layering, cover the dish with plastic wrap and refrigerate for a minimum of 4 hours, although overnight is ideal. This time allows the flavors to blend beautifully and the cake to firm up, ensuring that it holds its shape when sliced.
Recommended Refrigeration Time for Best Results
While you can serve the cake after a few hours, waiting overnight truly enhances the flavor. The longer it sits, the more the ingredients meld together, creating a deliciously cohesive dessert that is sure to impress.
Tips on Serving and Presenting the Cake After Chilling
When it’s time to serve, remove the cake from the refrigerator and take off the plastic wrap. For a professional finish, use a sharp knife to cut neat slices. Serve each piece on a plate and consider topping it with additional whipped cream, a sprinkle of crushed nuts, or a cherry for that classic banana split feel.
Nutritional Information and Serving Suggestions
Understanding the nutritional content of your No Bake Banana Split Cake can help you enjoy it in moderation as part of a balanced diet.
Overview of Serving Size and How It Fits into a Balanced Diet
This cake serves approximately 12 people, with each slice providing a delightful treat that can fit into a variety of dietary lifestyles. While it contains sugar and fats, it also incorporates fruit, providing some nutritional benefits.
Nutritional Breakdown of Key Ingredients
Here’s a rough breakdown per slice (assuming 12 slices total):
– Calories: Approximately 250
– Total Fat: 12g
– Saturated Fat: 7g
– Sugars: 15g
– Protein: 3g
Keep in mind that these values can vary based on specific brands and quantities used.
Suggestions for Pairing with Beverages or Other Desserts for a Complete Meal
This dessert pairs wonderfully with a hot cup of coffee or a light herbal tea. If you’re hosting a gathering, consider serving it alongside a fresh fruit salad or a scoop of vanilla ice cream for a delightful contrast in temperature and texture.
Conclusion
Making an Easy No Bake Banana Split Cake is not just about creating a dessert; it’s about crafting a joyful experience. The process of layering, chilling, and finally serving this sweet treat creates not just a delicious dish, but wonderful memories to share with family and friends.
I encourage you to experiment with variations, whether it be different fruits or unique flavor combinations. This recipe can easily become a cherished family tradition, perfect for summer gatherings, birthdays, or any special occasion. With its creamy texture, delightful flavors, and vibrant presentation, this cake is sure to steal the spotlight at your next dessert table. Enjoy making and sharing this delightful treat!