Introduction
Homemade jams and preserves have seen a resurgence in popularity, as more people turn to the kitchen for both creativity and sustainability. There’s something intrinsically rewarding about taking fresh, seasonal produce and transforming it into something delicious that can be enjoyed long after the harvest. Among the plethora of fruit combinations available, strawberry rhubarb jam stands out as a perennial favorite, celebrated for its unique balance of sweetness and tartness.
Strawberries, with their vibrant color and luscious taste, are the star of this jam, complemented beautifully by the tangy edge of rhubarb. These fruits are not only a delight for the palate but also offer numerous nutritional benefits. In our modern era, the importance of using seasonal produce cannot be overstated. When fruits are harvested at their peak ripeness, they yield the most vibrant flavors, which are essential for creating the perfect jam. The joy of creating and sharing homemade jam extends beyond the flavor; it fosters a sense of connection to the ingredients and the seasons.
The Allure of Strawberry Rhubarb Jam
Strawberry rhubarb jam has a rich history in American cuisine, dating back to the early settlers who brought rhubarb from Europe. As strawberries became a staple of American gardens, the two ingredients naturally paired together, becoming a beloved combination that many still cherish today. This jam embodies the essence of spring and summer, with the bright hues of strawberries and the refreshing tang of rhubarb.
The flavor profile of strawberry rhubarb jam is truly unique. The sweetness of the strawberries serves as a perfect counterbalance to the tartness of the rhubarb, resulting in a refreshing spread that can elevate any dish. Whether slathered on a warm piece of toast, dolloped on top of yogurt, or used as a filling for pastries, this jam’s versatility makes it a staple in many kitchens.
Ingredients Breakdown
To create a batch of this delightful strawberry rhubarb jam, you’ll need a few key ingredients, each playing a crucial role in the final product.
1. Fresh Strawberries: Strawberries are the primary ingredient in this jam, bringing sweetness and a beautiful crimson color. These berries are rich in vitamins C and K, folate, and antioxidants, making them a delicious and healthful addition to your diet. When selecting strawberries, look for plump, firm berries with a rich red color and a fresh aroma. Avoid those that are dull or overly soft, as they may not have the best flavor or texture for jam-making.
2. Rhubarb: Often considered a vegetable, rhubarb is used like a fruit in many culinary applications. It is known for its tartness and adds a refreshing zing to jams. Rhubarb is also a good source of vitamins K and C, as well as dietary fiber. When preparing rhubarb, choose stalks that are firm and brightly colored. Avoid any yellowing or wilted stalks. To prepare rhubarb for your jam, simply wash it thoroughly and remove any leaves, as they are toxic. Cut the stalks into small, even pieces to ensure they cook uniformly.
3. Granulated Sugar: Sugar plays a vital role in preserving the jam and balancing the flavors. It not only sweetens the mixture but also helps to create the gel-like consistency that defines jam. While the amount of sugar may seem high, remember that it acts as a preservative, extending the shelf life of your jam while enhancing the natural flavors of the fruit.
4. Lemon Juice: The addition of lemon juice is essential for enhancing the overall flavor of the jam. It adds a bright acidity that complements the sweetness of the strawberries and the tartness of the rhubarb. Additionally, the acidity of lemon juice helps to preserve the vibrant color of the jam, ensuring that it remains visually appealing.
5. Fruit Pectin: Pectin is a natural thickening agent found in fruits, and it is crucial for achieving the desired consistency in your jam. While strawberries and rhubarb contain some pectin, additional commercial fruit pectin may be necessary to ensure a well-set jam. There are different types of pectin available, such as liquid and powdered, so follow the instructions on your chosen product for the best results.
Preparation Steps in Detail
Preparing the Fruits
Before diving into the cooking process, it is essential to prepare the fruits properly. The first step is to wash and hull the strawberries. Rinse them under cool water to remove any dirt or pesticides, then gently pat them dry with a clean towel. To hull strawberries, simply remove the green leafy tops and the white part at the top of the berry. This will allow the juicy, sweet flesh to take center stage.
Next, focus on the rhubarb. After washing the stalks, chop them into small, even pieces—about half an inch thick. This size will ensure that they cook evenly and integrate well with the strawberries during the jam-making process. The texture of the rhubarb will soften as it cooks, contributing to the overall consistency of the jam.
Creating the Fruit Mixture
Once the fruits are prepped, it’s time to create the fruit mixture that will form the base of your jam. In a large mixing bowl, combine the chopped strawberries and rhubarb. This is also a great time to add the granulated sugar and lemon juice. Stir the mixture gently to ensure that the sugar and lemon juice are evenly distributed among the fruits.
One crucial step in this process is to let the fruit mixture sit for a while—ideally, about 30 minutes to an hour. Allowing the fruits to rest not only enhances flavor extraction but also helps to draw out the natural juices from the strawberries and rhubarb. This process will yield a syrupy mixture that will cook down beautifully, creating a rich and flavorful jam.
As you wait for the fruit to macerate, you can prepare your equipment. Sterilizing your jars and lids is essential for ensuring the longevity of your jam. Place your jars in a boiling water bath or run them through the dishwasher on a hot cycle. This step is critical in preventing spoilage and ensuring that your jam remains fresh and safe to eat.
With your fruits prepared and jars sterilized, you’re well on your way to creating a delightful batch of strawberry rhubarb jam. Stay tuned for the next steps in the cooking process, where we will transform your fruit mixture into a luscious, spreadable delight.

Importance of Mixing Sugar with the Fruit Mixture
When making strawberry rhubarb jam, the relationship between sugar and fruit is fundamental. Sugar not only sweetens the tartness of rhubarb but also plays a crucial role in the texture and preservation of the jam. Mixing sugar with the fruit mixture before cooking helps to draw out the natural juices from the strawberries and rhubarb, leading to a more cohesive mixture. This interaction allows the sugars to dissolve evenly throughout the fruit, ensuring a balanced flavor profile and promoting the gel-like consistency that is characteristic of high-quality jam.
Moreover, the sugar acts as a preservative, inhibiting the growth of bacteria and molds, which is essential for extending the shelf life of your homemade jam. When the sugar is properly integrated with the fruit, it helps create a beautiful, glossy finish once the jam is cooked, enhancing the visual appeal of your final product.
Cooking the Jam
Achieving the Perfect Boiling Point
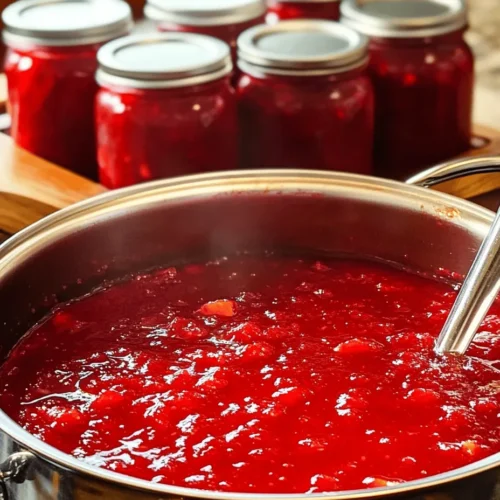
Once your fruit and sugar mixture has had time to macerate, it’s time to cook the jam. Pour the mixture into a large, heavy-bottomed saucepan to ensure even heat distribution. Begin heating over medium-high heat, stirring continuously until the sugar is fully dissolved.
The key to perfect jam lies in reaching the right boiling point. You should aim for a rolling boil, where the mixture bubbles vigorously and cannot be stirred down. This stage is crucial as it activates the pectin, which helps the jam to thicken. Use a candy thermometer to monitor the temperature; the ideal range for jam is between 220°F to 222°F (104°C to 106°C) at sea level.
Tips for Preventing Burning During Cooking
Jam-making can be a delicate process, and preventing burning is essential for achieving a perfect batch. Here are some tips to avoid scorching your mixture:
1. Use a Heavy-Bottomed Pot: A heavy pot distributes heat evenly and reduces the chances of hot spots that can burn the jam.
2. Stir Frequently: Keep stirring the mixture to prevent it from sticking to the bottom of the pot, especially as it thickens.
3. Monitor the Heat: If you notice that the jam starts to bubble too aggressively, reduce the heat slightly to maintain a steady boil without burning.
4. Avoid Overcrowding: Cooking in smaller batches can help maintain better control over the temperature and consistency.
Understanding Gel Consistency and How to Test for Doneness
As your jam approaches the boiling point, it’s essential to test for doneness. The gel consistency can be checked using the plate test. Here’s how:
1. Chill a Plate: Place a small plate in the freezer for about 10 minutes before you start cooking.
2. Drop Test: Once your jam reaches a rolling boil, drop a spoonful onto the chilled plate.
3. Check the Consistency: After a minute, run your finger through the jam on the plate. If it holds its shape and doesn’t run back together, your jam is ready for jarring. If not, continue boiling and testing every couple of minutes.
Jarring the Jam
Importance of Sterilizing Jars for Preservation
Before jarring your jam, it’s crucial to ensure that your jars are properly sterilized. This step is vital for preventing spoilage and ensuring that your jam can be stored safely for extended periods. To sterilize jars:
1. Wash Jars and Lids: Begin by washing the jars and lids in hot, soapy water.
2. Boiling Method: Place the clean jars in a large pot of boiling water for 10 minutes. Ensure they are fully submerged.
3. Oven Method: Alternatively, you can place the jars in a 225°F (107°C) oven for 10-15 minutes.
Best Practices for Filling Jars and Ensuring a Proper Seal
When filling the jars, always use a ladle and a funnel to prevent mess. Fill each jar to about ¼ inch from the top, which is known as headspace. This space is essential for allowing the jam to expand during processing.
After filling, wipe the rims of the jars with a clean, damp cloth to remove any residue that could prevent a proper seal. Place the sterilized lids on top and screw on the metal bands until they are fingertip-tight.
Explanation of Headspace and Its Significance in Canning
Headspace is the space between the top of the food in a jar and the jar lid. It is crucial because it allows for the expansion of the jam during processing and cooling. Too little headspace can cause the jar to break, while too much can lead to spoilage due to air exposure. For jams, a headspace of 1/4 inch is ideal.
Flavor Enhancements and Variations
Suggestions for Other Flavor Additions
While strawberry rhubarb jam is delightful on its own, a few additions can elevate its flavor profile. Consider infusing your jam with:
– Vanilla Extract: A splash of vanilla extract adds warmth and depth, complementing the fruity tartness.
– Cinnamon or Nutmeg: A pinch of these spices can introduce a subtle warmth that enhances the overall flavor.
– Lemon Zest: A touch of lemon zest brightens the jam and balances the sweetness with its citrusy notes.
Alternative Fruit Combinations
Experimenting with other fruit combinations can yield exciting results. Some combinations that pair well with strawberry and rhubarb include:
– Peaches: Their sweetness balances the tartness of rhubarb perfectly.
– Blackberries: The deep flavor of blackberries adds richness to the jam.
– Cherries: Tart cherries can add a unique twist to your jam.
Discussion on Reducing Sugar for a Healthier Version
If you’re looking to create a healthier jam, you can experiment with reducing sugar. Keep in mind that sugar is essential for the gelling process, so if you choose to cut back, consider using a low-sugar pectin that is designed for reduced-sugar recipes. Alternatively, you can substitute some of the sugar with natural sweeteners like honey or maple syrup, but be aware that this may alter the flavor and texture.
Ideas for Using the Jam Beyond Spreading on Toast
Your delicious strawberry rhubarb jam can be utilized in many ways beyond just spreading it on toast. Here are some creative ideas:
– Topping for Desserts: Use it as a topping for cheesecake, yogurt, or ice cream.
– In Baking: Incorporate it into muffins, cakes, or pastries for a fruity surprise.
– Savory Dishes: Pair it with meats like pork or chicken as a glaze or sauce to enhance the flavor profile.
– Cocktails: Create unique cocktails by mixing the jam with spirits and soda water for a refreshing drink.
Storage and Shelf Life
Best Practices for Cooling and Storing Jam
Once your jars are filled and sealed, allow them to cool at room temperature. Place them on a clean kitchen towel or wire rack to prevent moisture from accumulating on the jars. Once cooled, check the seals by pressing down in the center of the lid. If it pops back, the jar hasn’t sealed properly and should be refrigerated and used within a few weeks.
For properly sealed jars, store them in a cool, dark place, such as a pantry or cupboard. Properly canned jam can last for up to one year without losing quality.
Explanation of Refrigeration Versus Canning for Long-Term Storage
If you prefer not to can your jam, refrigeration is another option for short-term storage. Unsealed jars of jam can be kept in the refrigerator for up to three weeks. However, for long-term storage, canning is the best method as it creates a vacuum seal that preserves the jam without the need for refrigeration.
Tips on Identifying Spoilage and Ensuring Safety of Homemade Jams
Always check your jam for signs of spoilage before consuming. Common indicators include an off smell, discoloration, or a bulging lid. If any signs of spoilage are present, it’s best to discard the jar to avoid foodborne illnesses. Additionally, if you’re unsure about a jar’s safety, it’s better to err on the side of caution.
Conclusion
Making homemade strawberry rhubarb jam is a rewarding experience that brings together the joy of cooking and the satisfaction of using seasonal ingredients. Not only does it allow you to create a delicious treat, but it also provides an opportunity to share something special with friends and family.
As you explore the flavors and variations of this classic recipe, remember that the kitchen is the perfect place for experimentation. Try different fruit combinations, flavor infusions, and even sugar alternatives to create your unique version of this timeless jam.
In the end, the true pleasure of making strawberry rhubarb jam lies in the memories created while preparing it and the smiles it brings when shared. So gather your ingredients, roll up your sleeves, and enjoy the delightful process of making something delicious and memorable.