
Introduction: Reliving Childhood Memories with Orange Floats
In the sweltering heat of summer, few treats can evoke the joy and nostalgia of childhood quite like a classic Orange Float. This delightful concoction, a harmonious blend of tangy orange soda and creamy vanilla ice cream, offers a refreshing escape from the summer sun. The moment you take a sip, you are transported back to carefree days spent playing outside, laughter echoing in the air, and the sweet taste of summer lingering on your lips. Whether enjoyed at a backyard barbecue, a family gathering, or simply on a lazy afternoon, Orange Floats are the quintessential summer treat that brings happiness with every sip.
In this article, we will explore the origins of this beloved beverage, the step-by-step recipe to create your own Orange Floats, and the joy it can bring to gatherings, family celebrations, or simply a relaxing day at home. Let’s dive into the nostalgia of Orange Floats and discover how to recreate this cherished classic in your own kitchen.
The Nostalgic Appeal of Orange Floats
Understanding the charm of Orange Floats can enhance your appreciation of this treat. Often enjoyed during summer picnics and family outings, these floats don’t just satisfy a sweet tooth; they evoke warm memories and a sense of carefree joy. The origins of the float can be traced back to the early 19th century when soda fountains began popping up across America. These establishments quickly became social hubs, where patrons could enjoy the latest carbonated drinks, often served with a scoop of ice cream.
The combination of soda and ice cream, initially popularized with root beer floats, expanded to include a variety of flavors, with orange soda becoming a favorite among many. The bright, citrusy flavor of orange soda, paired with the creamy richness of vanilla ice cream, creates a sensory experience that transcends generations. For many, Orange Floats symbolize the epitome of summer—a time for family bonding, laughter, and enjoying life’s simple pleasures.
As you sip on your homemade Orange Float, you are not just indulging in a sweet treat; you are embracing a tradition that has been passed down through the years. This drink has often been a part of childhood celebrations, birthday parties, and lazy summer afternoons, making it a beloved staple in American culinary culture.
Ingredients That Make Orange Floats Irresistible
Creating the perfect Orange Float requires just a few key ingredients, each playing a vital role in delivering that refreshing and nostalgic experience. Let’s take a closer look at the components that come together to create this delicious summer drink.
Overview of Each Ingredient
1. Orange Soda: As the star ingredient, orange soda brings vibrant flavor and effervescence to your float. The zesty, sweet notes of the soda awaken your taste buds and provide the signature orange hue that makes this drink visually appealing. When selecting your orange soda, consider going for a brand that uses natural flavors for an authentic taste.
2. Vanilla Ice Cream: The creamy contrast of vanilla ice cream elevates the float’s texture, creating a delightful mouthfeel. The richness of the ice cream balances the tanginess of the soda, making each sip a harmonious blend of flavors. For the best results, opt for high-quality ice cream with real vanilla flavoring.
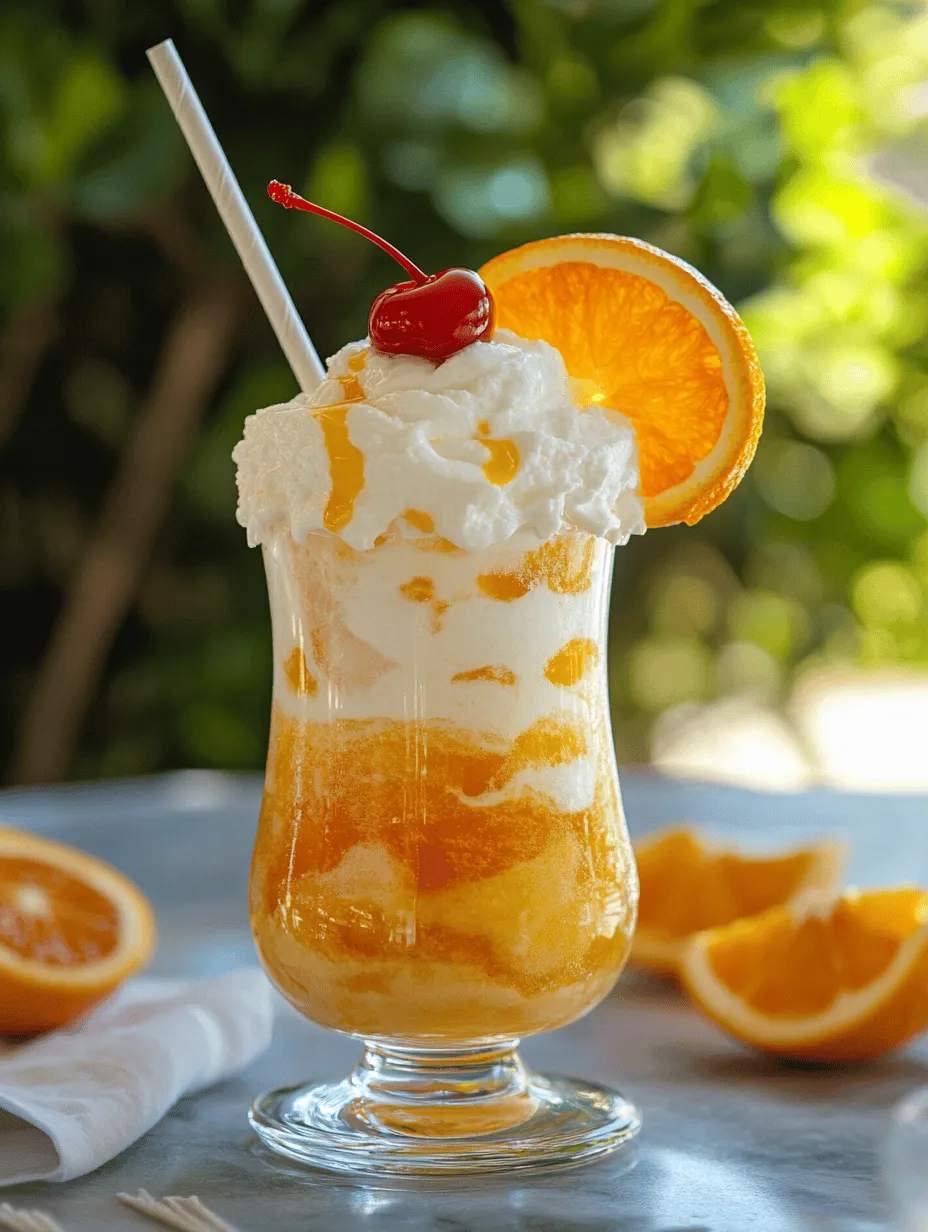
3. Whipped Cream: A generous dollop of whipped cream adds richness and visual appeal to the Orange Float. It not only enhances the overall texture but also offers a light, fluffy contrast that complements the other ingredients. You can use store-bought whipped cream or make your own for a fresher taste.
4. Maraschino Cherries and Orange Slices: Classic garnishes like maraschino cherries and orange slices enhance both the presentation and taste of your float. The cherries add a touch of sweetness and a pop of color, while the orange slices provide a refreshing citrus aroma that ties the whole drink together.
Ingredient Variations
While the classic Orange Float is undeniably delicious, you may want to customize it to suit different tastes or dietary needs. Here are a few ingredient variations to consider:
– Sugar-Free Soda: For those watching their sugar intake, a sugar-free orange soda can be a great alternative without sacrificing flavor. Look for options that still maintain a bold orange taste.
– Dairy-Free Ice Cream: If you’re following a dairy-free diet, there are plenty of creamy coconut or almond milk-based ice cream options available. These alternatives can provide the same satisfying texture and richness you expect from traditional vanilla ice cream.
– Flavor Variations: Experiment with different flavors of soda or ice cream. For example, you could try using a twist of cream soda for a unique flavor combination or a fruity sorbet for a lighter version.
Step-by-Step Guide to Making Orange Floats
Now that we’ve explored the delicious ingredients that make up an Orange Float, it’s time to dive into the preparation. Follow these steps for a smooth floating experience:
Preparing Your Ingredients
Before you embark on your Orange Float adventure, gather all your ingredients to ensure a seamless preparation process. Here’s what you’ll need:
– Ingredients:
– 1 cup of orange soda
– 2 scoops of vanilla ice cream
– Whipped cream (to taste)
– Maraschino cherries and orange slices (for garnish)
– Equipment:
– Tall glasses or float cups
– A spoon for scooping ice cream
– A straw (optional, but adds to the fun)
Step 1: Chill Your Glasses
For the ultimate refreshing experience, chill your glasses in the freezer for about 15–20 minutes before assembling your floats. Cold glasses will help keep your Orange Floats frosty and enjoyable, especially on hot summer days.
Step 2: Add the Ice Cream
Once your glasses are chilled, add two generous scoops of vanilla ice cream to each glass. Position the scoops in the center to allow space for the soda, creating a glorious mound that promises a delightful mix of flavors.
Step 3: Pour the Orange Soda
Carefully pour the orange soda over the ice cream. Start slowly to prevent overflow and allow the soda to fizz and foam as it interacts with the ice cream. The effervescence will create a beautiful swirling effect, and watching the soda rise is part of the fun.
Step 4: Top with Whipped Cream
After pouring the soda, add a generous dollop of whipped cream on top of the ice cream. This step is crucial for that indulgent touch, elevating your Orange Float to a dessert-worthy beverage.
Step 5: Garnish
Finally, finish off your Orange Float with a maraschino cherry on top and a slice of orange on the rim of the glass. This not only adds aesthetic appeal but also gives a hint of extra flavor with each sip.
Enjoy your Orange Floats immediately while they are frosty and fresh, relishing the delightful combination of flavors and the joy they bring. Whether you’re sipping alone or sharing with friends and family, this classic drink is sure to bring back those cherished summer memories.
Stay tuned as we explore more about the perfect Orange Float, including tips for best results and answers to common questions about this refreshing summer treat.

Crafting the Perfect Orange Float
Creating the perfect Orange Float requires careful attention to detail at each step of the recipe. This classic summer treat is not only refreshing but also visually appealing. Below, we delve into each stage of the preparation process to help you achieve that ideal layered look and mouthwatering taste.
Pouring the Soda: Tips for Creating the Perfect Base
The foundation of your Orange Float is the soda, and the choice of orange soda is crucial. Opt for a high-quality, naturally flavored soda to enhance the overall taste. To create a beautiful contrast with the ice cream, follow these steps:
1. Choose the Right Glass: Select a tall, clear glass, as this will showcase the vibrant orange hue of the soda and the creamy ice cream layers beautifully.
2. Chill Your Glass: Before pouring your soda, chill your glass in the refrigerator or freezer for about 15 minutes. A cold glass helps maintain the carbonation of the soda and keeps your float refreshingly cool.
3. Pouring Technique: Gently tilt the glass at a 45-degree angle and slowly pour the soda down the side of the glass. This method minimizes foam and allows the soda to fill the glass without creating excessive bubbles, helping maintain that perfect layered look.
4. Fill Adequately: Fill your glass about two-thirds full with soda. This will leave sufficient space for the ice cream without overflowing.
Adding Ice Cream: Techniques for Achieving the Perfect Scoop
Ice cream is the heart of the Orange Float, and the right technique can make or break the experience. Here’s how to achieve the perfect scoop:
1. Choose Your Ice Cream: Vanilla ice cream is the classic choice, pairing beautifully with orange soda. However, for a twist, consider other flavors like orange sherbet or even coconut ice cream for a tropical vibe.
2. Scoop Smartly: Use a sturdy ice cream scoop or a large spoon. To make scooping easier, dip your scoop in hot water for a few seconds before taking out the ice cream. This will help the ice cream slide out smoothly and maintain a nice rounded shape.
3. Layering: Instead of just plopping the scoop on top, gently place it into the glass. This allows the ice cream to sit just above the soda, creating that classic float effect. You might want to use 1-2 generous scoops, depending on your glass size.
The Art of Foaming: Understanding the Chemistry Behind the Float
The delightful foaming that occurs when you combine soda and ice cream is a beautiful chemistry in action. Here’s how you can enhance this experience:
1. Temperature Matters: Ensure your soda is cold but not ice-cold. If the soda is too cold, it can inhibit the foaming effect. A slightly warmer soda will create a nice frothy head that enhances the float’s presentation.
2. Carbonation is Key: The bubbles in the soda are responsible for the foaming. When the ice cream is added, it disrupts the carbonation, leading to a delightful fizz. To achieve a spectacular foam, add the ice cream slowly and watch the bubbles rise.
3. Foam Control: If the foam rises too high, gently tap the glass on the counter to settle it without spilling. This keeps the presentation neat and helps maintain the layers.
Whipped Cream Application: Techniques for a Beautiful Top Layer
No Orange Float is complete without a luscious dollop of whipped cream. Here’s how to apply it for maximum impact:
1. Make Your Own Whipped Cream: For the best flavor and texture, consider making your own whipped cream. Whip heavy cream with a bit of powdered sugar and vanilla extract until soft peaks form. This adds a homemade touch that elevates your float.
2. Piping for Precision: Using a piping bag fitted with a star tip can create a beautiful swirl on top of your float. Start from the outer edge of the glass and work your way inwards, creating a spiral that peaks in the middle.
3. Portion Control: Aim for a generous yet controlled amount of whipped cream. Too much can overshadow the flavors of the float, while just the right amount adds creaminess and visual appeal.
Garnishing with Cherries and Oranges: Ideas for a Stunning Finish
To enhance both the look and flavor of your Orange Float, garnishing is key. Here are some ideas:
1. Maraschino Cherries: The classic garnish. Place one or two cherries on top of your whipped cream for a pop of color and sweetness.
2. Orange Slices: Add a thin slice of fresh orange to the rim of the glass or float it on top of the whipped cream. This not only adds a citrusy aroma but also enhances the overall presentation.
3. Fresh Mint Leaves: A sprig of fresh mint can provide a splash of green and a refreshing aroma, which complements the orange flavor beautifully.
4. Creative Touches: For a fun twist, consider adding colorful sprinkles or toasted coconut on top of the whipped cream for an added texture and visual appeal.
Serving Suggestions: Making Orange Floats a Social Experience
Orange Floats are not just a treat; they are a delightful experience meant to be shared. Here are some ideas on how to serve them effectively.
Ideal Occasions for Serving
Orange Floats are versatile and can fit into various occasions. Here are a few ideal times to serve them:
1. Birthday Parties: These floats can serve as a fun dessert option for birthday celebrations, especially for kids. The vibrant colors and delicious flavors make them a hit among children and adults alike.
2. Summer Barbecues: On hot summer days, Orange Floats can be a refreshing treat. Serve them alongside grilled burgers and hot dogs for a complete summer meal.
3. Family Gatherings: When hosting family get-togethers, presenting a float station where guests can customize their floats with different sodas, ice creams, and toppings can make the event interactive and enjoyable.
4. Picnics: Pack your ingredients separately and assemble the floats at the picnic site. This keeps the soda fizzy and the ice cream from melting, allowing everyone to enjoy a fresh float.
Pairing with Other Summer Treats
To elevate your gathering, consider pairing Orange Floats with complementary dishes:
1. Fruit Platters: Fresh fruits like strawberries, watermelon, or a citrus medley can enhance the refreshing experience of the floats.
2. Grilled Treats: Serve your floats alongside grilled options like chicken skewers or veggie burgers, which balance the sweetness of the float with savory flavors.
3. Light Salads: A crisp summer salad, such as a cucumber or pasta salad, can provide a refreshing contrast to the creamy sweetness of the Orange Float.
4. Savory Snacks: Items like chips and guacamole or cheese platters can create a well-rounded menu, appealing to both savory and sweet preferences.
Nutritional Information and Considerations
While Orange Floats are a delightful indulgence, it’s essential to be mindful of their nutritional aspects. Here’s a breakdown:
– Calories: A typical Orange Float made with one scoop of vanilla ice cream and one cup of orange soda can range from 250 to 400 calories, depending on the brand of soda and ice cream used.
– Sugar Content: Orange floats can be high in sugar, with an average serving containing around 30-50 grams of sugar. For a healthier option, consider using sugar-free soda or a lower-sugar ice cream.
– Serving Size: Moderation is crucial. Enjoying Orange Floats as an occasional treat rather than a daily indulgence can help maintain a balanced diet.
– Mindful Enjoyment: Consider making mini floats using smaller glasses to satisfy your sweet tooth without overindulging. This way, you can still enjoy the flavors without consuming excessive calories.
Conclusion: The Timeless Joy of Orange Floats
Orange Floats encapsulate the essence of summer nostalgia, bringing a sense of joy and refreshment that resonates with many. This delightful treat not only quenches thirst but also evokes memories of simpler times spent under the sun with friends and family.
Whether you’re enjoying an Orange Float alone on a hot day or sharing them at a gathering, each sip offers a blend of sweetness and nostalgia. The process of crafting these floats, from pouring the soda to adding garnishes, is an art that enhances the experience, making it a beloved summer refreshment that continues to bring smiles to faces of all ages. So, gather your ingredients and create your own Orange Floats, celebrating the timeless joy they bring to our lives.
