
Introduction
If you’re looking for a dessert that beautifully combines the rich flavors of cheesecake with the light, flaky texture of sopapillas, look no further than Delightful Sopapilla Cheesecake Bars. This decadent treat has garnered a loyal following, making it a favorite at potlucks, family gatherings, and holiday celebrations. But what is it about these bars that makes them so irresistible?
Sopapilla Cheesecake Bars are a tantalizing fusion of two beloved desserts: the traditional Mexican sopapilla and the classic cheesecake. The sopapilla, known for its pillowy texture and light sweetness, has roots in Mexican cuisine where it is often enjoyed as a warm, fried treat drizzled with honey or dusted with powdered sugar. By transforming this traditional dessert into a cheesecake bar, we achieve a delightful balance of creamy and crunchy textures, making each bite a celebration of flavor.
This recipe is not only a testament to culinary creativity but also a reflection of cross-cultural influences in the world of food. With its buttery crescent roll base, a smooth cream cheese filling, and a sprinkle of cinnamon sugar topping, each layer complements the others beautifully, creating a dessert that is as visually appealing as it is tasty.
The Allure of Sopapilla Cheesecake Bars
At its core, the sopapilla is a cherished dessert that has been enjoyed for generations. Its versatility allows for various interpretations, from being served as a simple pastry with a drizzle of honey to more elaborate versions featuring fruit fillings or sweet toppings. In the case of Sopapilla Cheesecake Bars, we take the essence of this beloved dessert and elevate it into a creamy, dreamy cheesecake that is easy to prepare and even easier to devour.
The transition of traditional sopapilla into a cheesecake bar format is a game-changer. Gone are the days of frying dough and risking a mess in the kitchen. Instead, this recipe offers a streamlined approach that yields beautiful, rectangular bars that are perfect for slicing and serving. The use of crescent rolls as the base not only provides that flaky texture we love but also simplifies the entire process, making it accessible for novice bakers and busy cooks alike.
Furthermore, the convenience of this recipe cannot be overstated. With just a handful of ingredients and minimal prep time, you can whip up a batch of Sopapilla Cheesecake Bars that will impress your guests and become a staple in your dessert repertoire. Whether you’re celebrating a special occasion or simply craving a sweet treat, these bars are sure to delight.
Ingredients Breakdown
Before diving into the recipe, let’s take a closer look at the key ingredients that contribute to the magic of these Sopapilla Cheesecake Bars:
Crescent Rolls: The Flaky Base
Crescent rolls serve as the foundation of this dessert, providing a flaky and buttery texture that perfectly complements the creamy filling. Their convenience comes from being pre-made, which cuts down on prep time and simplifies the baking process. When baked, the rolls puff up beautifully, creating a light and airy base that holds the cheesecake filling.
Cream Cheese: The Creamy Filling
The star of the show, cream cheese, brings a rich and velvety texture to the bars. It is essential for achieving that classic cheesecake taste, providing a tangy flavor that balances out the sweetness of the other ingredients. For best results, ensure the cream cheese is softened to room temperature, making it easier to blend smoothly into the filling.
Granulated Sugar: Sweetness Factor
Granulated sugar plays a crucial role in sweetening the cream cheese mixture. It enhances the overall flavor profile, making the cheesecake filling delectably sweet while ensuring it remains balanced and not overly sugary. The right amount of sugar is key to achieving that perfect cheesecake taste that pairs so well with the flaky base.
Vanilla Extract: Enhancing Flavor
A splash of vanilla extract elevates the flavor of the filling, adding warmth and depth to the overall taste. This ingredient is often considered the secret weapon in many dessert recipes, enhancing the sweetness and providing a delightful aroma that will make your kitchen smell heavenly while these bars are baking.
Unsalted Butter: Richness and Moisture
Unsalted butter is used to add richness and moisture to both the base and the topping. Its fat content helps create a tender texture, ensuring that the bars don’t become dry during baking. The unsalted variety is preferred, as it allows you to control the overall saltiness of the dessert.
Sugar and Cinnamon Topping: Crunch and Flavor Contrast
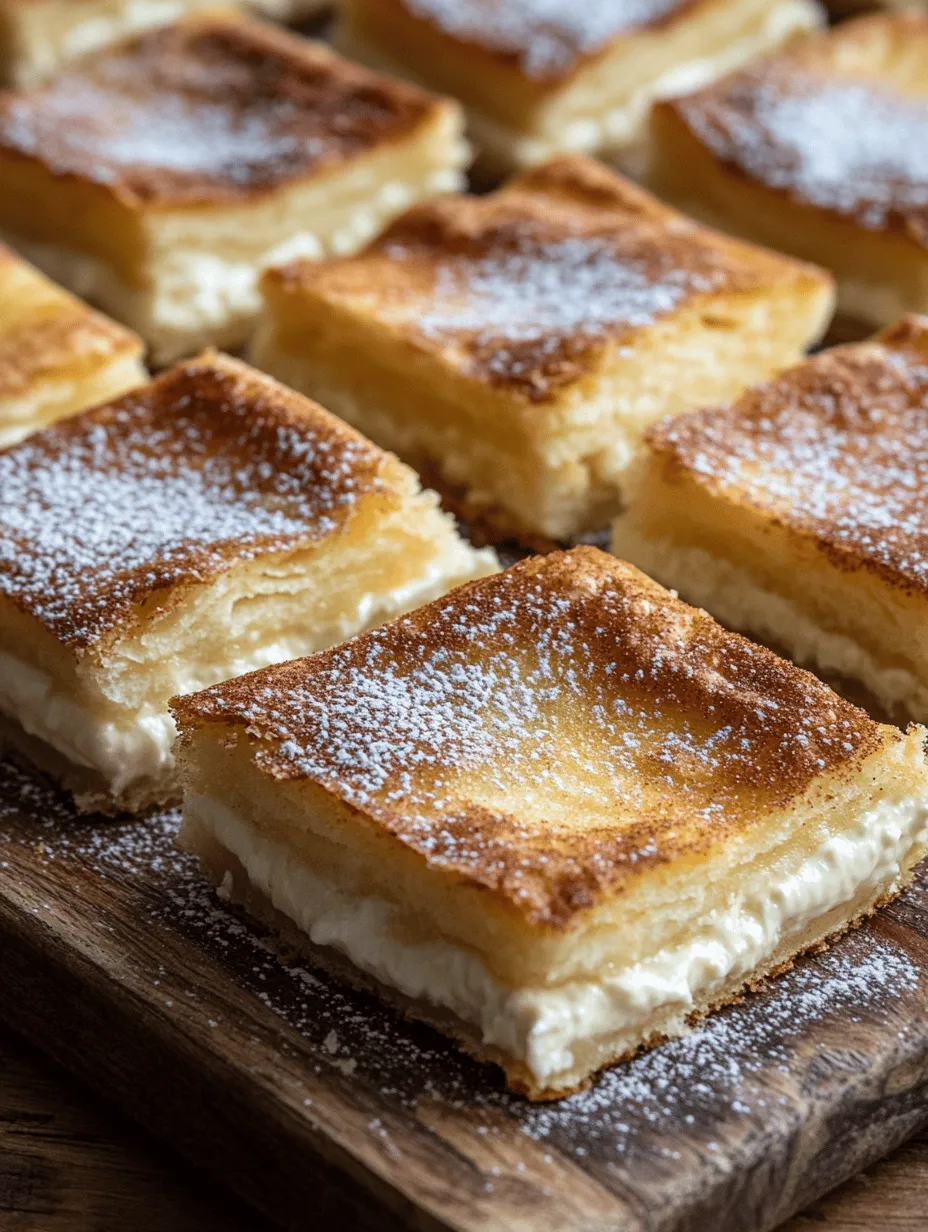
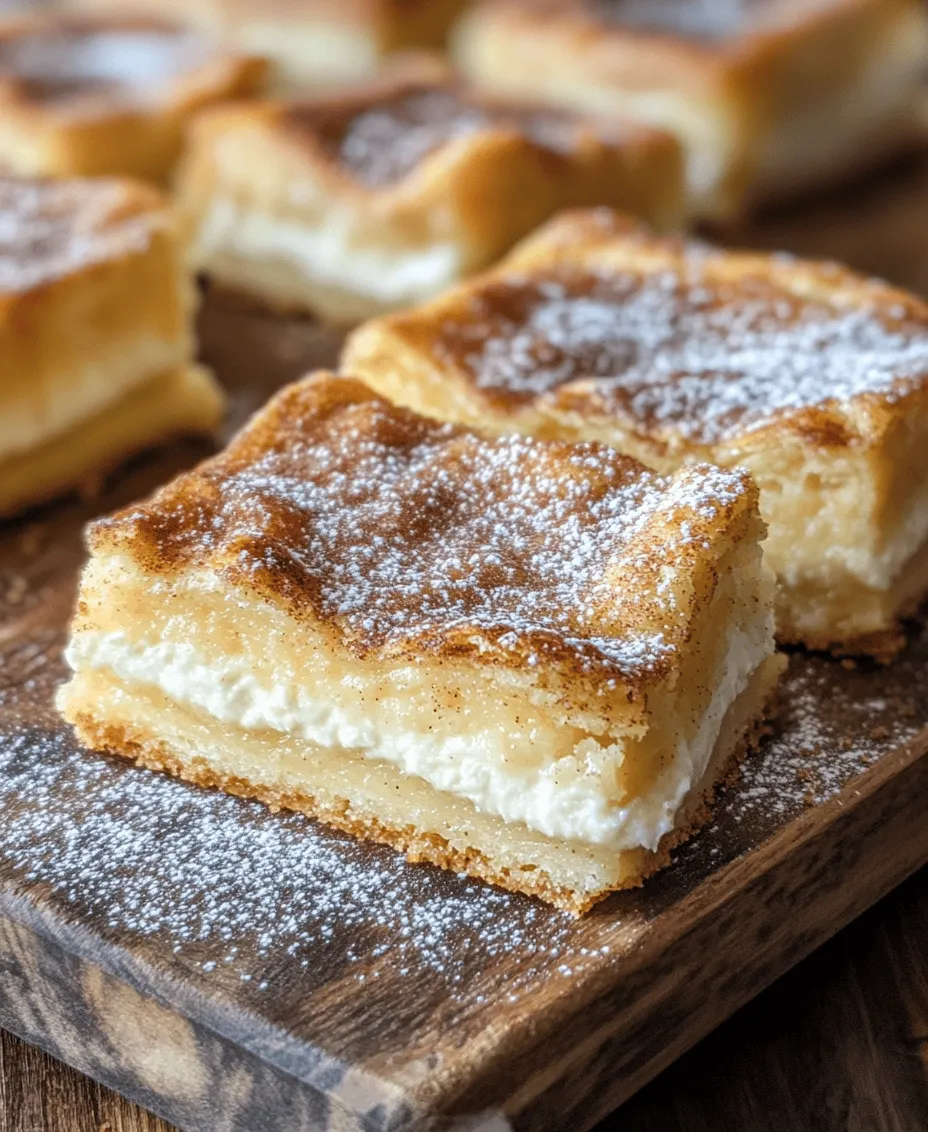
The sugar and cinnamon topping adds a delightful crunch and a burst of flavor that contrasts beautifully with the creamy filling. This mixture is sprinkled on top before baking, creating a slightly caramelized crust that enhances both the presentation and the taste of the bars.
Optional Ingredient: Powdered Sugar for Presentation
While not essential, a dusting of powdered sugar on top of the finished bars adds a touch of elegance and sweetness. It makes for a beautiful presentation, especially if you’re serving these bars for a special occasion or a gathering.
Step-by-Step Instructions
Now that we’ve covered the key ingredients that make up these delightful bars, let’s get into the essential steps for preparing them.
Preheating the Oven
Before you begin mixing and assembling, it’s crucial to preheat your oven to 350°F (175°C). This ensures that the bars bake evenly and achieve that perfect golden-brown color. Preheating also creates an ideal environment for the crescent rolls to puff up beautifully, resulting in a light, flaky base.
Preparing the Cream Cheese Mixture
To make the cream cheese filling, start by placing the softened cream cheese in a mixing bowl. Using a handheld mixer or a stand mixer fitted with a paddle attachment, beat the cream cheese until smooth and creamy. This step is essential for achieving a velvety texture in your filling.
Once the cream cheese is smooth, gradually add in the granulated sugar and continue to mix until well combined. The mixture should be creamy and free of lumps. Next, add in the vanilla extract and mix until fully incorporated. This will enhance the flavor of the filling and ensure a delectable taste in every bite.
Assembling the Bars
With your cream cheese mixture ready, it’s time to assemble the Sopapilla Cheesecake Bars. Start by unrolling one tube of crescent rolls and gently pressing it into the bottom of a greased 9×13-inch baking dish. Make sure to cover the entire bottom of the dish, sealing any seams to create a uniform base.
Once the first layer of crescent rolls is in place, spread the cream cheese mixture evenly over the dough. Use a spatula to smooth it out, ensuring that the filling reaches the edges of the baking dish.
After the cream cheese filling is spread, take the second tube of crescent rolls and unroll it over the top of the filling, similar to the first layer. Again, seal any seams to create a cohesive top layer.
Adding the Topping
To finish off the assembly, melt the unsalted butter and brush it generously over the top layer of crescent rolls. Then, in a small bowl, mix together the sugar and cinnamon, and sprinkle this mixture evenly over the buttered dough. This will create a delightful crunchy topping that enhances the flavor and makes the bars visually appealing.
With the bars assembled and ready to go, place them in the preheated oven and bake for approximately 30-35 minutes, or until the top is golden brown and the filling is set.
Stay tuned for the next part of the recipe, where we will delve into baking tips, serving suggestions, and answers to some common questions about this delicious dessert.
Layering the Crescent Rolls: Ensuring Even Distribution
To create the perfect base for your Delightful Sopapilla Cheesecake Bars, proper layering of the crescent rolls is essential. Begin by preheating your oven to 350°F (175°C) to ensure it’s hot and ready for baking. Open your crescent roll dough and gently unroll it onto a clean surface. Instead of pulling the dough apart into individual triangles, press the perforations together to form a single sheet. This step is crucial for achieving a cohesive crust that holds your cheesecake filling beautifully.
Carefully transfer the pressed dough into a greased 9×13-inch baking dish, allowing it to cover the bottom evenly. Use your fingers to stretch the dough slightly, if necessary, until it reaches the edges of the dish. The goal here is to create a uniform layer that will bake evenly and support the filling. For an extra touch of flavor, consider brushing a thin layer of melted butter over the dough before adding the cheesecake mixture. This will not only enhance the flavor but also help to seal the dough, preventing it from becoming soggy during baking.
Melting Butter: Proper Method and Alternatives
Melting butter is a straightforward task, but doing it correctly ensures you get the best flavor and texture for your dessert. The easiest method is to use a microwave-safe bowl. Cut your butter into small cubes and place it in the bowl. Microwave on high for about 20-30 seconds, checking it halfway through to avoid overheating. Stir the butter once melted to ensure even consistency.
If you prefer not to use a microwave, you can melt butter on the stovetop. Simply place the butter in a small saucepan over low heat, stirring continuously until fully melted. Alternatively, you could also use a double boiler for a gentler melting process. If you’re looking for healthier or alternative options, coconut oil or a non-dairy butter substitute can work just as well in this recipe, adding a unique flavor twist.
Sugar and Cinnamon Topping: How to Achieve an Even Sprinkle
The sugar and cinnamon topping is what elevates your Sopapilla Cheesecake Bars from good to amazing. For an even sprinkle, combine granulated sugar and ground cinnamon in a small bowl, using a ratio of about 1 cup of sugar to 2 tablespoons of cinnamon. Mix them thoroughly to ensure the cinnamon is evenly distributed throughout the sugar.
Once your cheesecake filling is layered, take a small sieve or sifter and gently dust the sugar-cinnamon mixture over the top. This method helps to create an even coating, ensuring that each bite of your bars is infused with that delicious sweet spice. To add a little extra flair, consider adding a pinch of nutmeg to the mixture for a warm, aromatic note.
Baking Process: Signs of Doneness and Baking Tips
Baking is where the magic happens! Place your prepared dish in the preheated oven and bake for 30-35 minutes. Keep an eye on your bars during the last few minutes of cooking. The edges should turn a beautiful golden brown, while the center might still appear slightly jiggly. This is perfectly normal, as the bars will continue to set as they cool.
To test for doneness, insert a toothpick into the center of the cheesecake layer. If it comes out clean or with a few moist crumbs (not wet batter), your bars are ready to be removed from the oven. If you notice that the tops are browning too quickly, you can cover the dish loosely with aluminum foil for the last few minutes of baking to prevent burning.
Cooling and Serving Suggestions
Once baked, remove the bars from the oven and allow them to cool in the pan for about 15-20 minutes. This cooling period is essential for the filling to set properly. After they’ve cooled, transfer the dish to the refrigerator and chill for at least 2 hours before slicing. Chilling enhances the flavors and makes cutting easier.
When ready to serve, cut the bars into squares or rectangles and arrange them on a decorative platter. For an added touch, dust the tops with additional cinnamon-sugar or drizzle with honey or caramel sauce. These Sopapilla Cheesecake Bars pair wonderfully with fresh fruit, such as sliced strawberries or blueberries, and a dollop of whipped cream or a scoop of vanilla ice cream. They’re perfect for parties, potlucks, or holiday gatherings, and their vibrant presentation will impress your guests.
Nutritional Information
Understanding the nutritional content of your Delightful Sopapilla Cheesecake Bars can help you manage portion sizes and dietary choices. Each serving (based on 12 servings from the full recipe) provides approximately:
– Calories: 210
– Total Fat: 11g
– Saturated Fat: 6g
– Carbohydrates: 26g
– Sugar: 12g
– Protein: 3g
This breakdown gives you a clear idea of what you’re enjoying. If you’re looking to make some dietary adjustments, consider using a low-sugar alternative for the sugar in the filling and topping, or try a gluten-free crescent roll option to accommodate dietary restrictions. These adjustments allow you to enjoy the flavors of this classic dessert while catering to various health needs.
Serving Suggestions
Presentation is key when serving your Sopapilla Cheesecake Bars. Garnishing with fresh mint leaves or a sprinkle of powdered sugar can enhance the visual appeal. Pairing the bars with seasonal fruits, like sliced peaches in summer or spiced apples in fall, creates a delightful contrast in flavors and textures.
These bars are excellent for various occasions, whether it be a casual family dinner or a festive holiday gathering. They can be served as a dessert after a hearty meal or enjoyed as a sweet snack throughout the day. For an impressive display, cut the bars into uniform pieces and stack them on tiered serving platters, adding a few decorative touches like fresh flowers or themed decorations according to the occasion.
Storing and Reheating
To maintain the freshness of your Sopapilla Cheesecake Bars, proper storage is essential. Place any leftovers in an airtight container and refrigerate. They can be stored in the refrigerator for up to 5 days. For longer storage, consider freezing the bars. Wrap each piece individually in plastic wrap, then place them in a freezer-safe bag or container. Frozen bars can last up to 3 months, but they’re best enjoyed within the first month for optimal flavor.
When it’s time to enjoy your frozen bars, allow them to thaw in the refrigerator overnight for the best texture. If you prefer to reheat them, simply place the desired amount on a microwave-safe plate and heat in 15-20 second intervals until warmed through. Avoid overheating, as this can compromise the creamy filling and flaky crust.
Conclusion
Making Delightful Sopapilla Cheesecake Bars is not only a rewarding experience but also a delightful way to satisfy your sweet tooth. With their creamy filling and sweet cinnamon topping, these bars encapsulate the essence of comfort food. Their simplicity in preparation makes them a go-to recipe for both novice and experienced bakers alike, perfect for any occasion.
Whether you’re serving them at a gathering or enjoying them as a sweet treat at home, these bars are sure to impress. Their appealing taste and inviting aroma will have everyone coming back for seconds. So grab your ingredients, follow the steps, and indulge in these delicious Sopapilla Cheesecake Bars. They’re a sweet delight that you won’t want to miss!