Introduction
There’s something undeniably satisfying about a poke cake. These delightful desserts have surged in popularity for their unique texture and flavor combinations, making them a favorite among home bakers. A poke cake is essentially a moist cake that has holes poked into it, allowing for a flavorful syrup or filling to seep in, ensuring every bite is packed with deliciousness. Today, we’re diving deep into one of the most indulgent varieties: the Butterfinger Poke Cake.
Imagine a cake that perfectly marries rich chocolate and creamy caramel, topped with the unmistakable crunch of Butterfinger candy bars. This Butterfinger Poke Cake is not only a feast for the taste buds but also a showstopper at any gathering. Whether you’re a seasoned baker or just starting, this easy-to-make dessert invites all skill levels to create something truly special. In this article, we will provide a detailed guide to making this decadent treat, from understanding the poke cake concept to step-by-step instructions for preparing the cake.
Understanding Poke Cakes
Definition and History of Poke Cakes
Poke cakes originated in the United States in the 1970s, emerging as a practical solution for creating moist, flavorful desserts with minimal effort. The concept is simple yet effective: after baking a cake, you poke holes in it and pour a liquid topping over the surface. This allows the flavors to penetrate deep into the cake, resulting in a moist and flavorful dessert that is unlike any traditional cake.
Historically, poke cakes gained popularity as an easy way to use premade cake mixes and quick toppings. They became a staple at potlucks, birthday parties, and family gatherings due to their simplicity and the ability to customize flavors. The charm of poke cakes lies in their versatility, which allows bakers to experiment with different flavors, fillings, and toppings, making them suitable for any occasion.
How Poke Cakes Differ from Traditional Cakes
Unlike traditional cakes that focus solely on the cake’s texture and flavor, poke cakes take a more dynamic approach. The key differentiator is the technique of poking holes into the cake, which creates a unique texture and allows for the infusion of additional flavors. This not only enhances the cake’s taste but also keeps it incredibly moist. Traditional cakes, while delicious, can sometimes dry out if not baked or stored properly. The poke cake method ensures that every bite is rich and flavorful.
The Versatility of Poke Cakes
One of the most appealing aspects of poke cakes is their versatility. While today we’re focusing on a Butterfinger Poke Cake, the possibilities are virtually endless. You can create poke cakes using various flavors, such as strawberry, lemon, and even pumpkin spice. Each variation can feature different fillings, from fruit purees to creamy toppings and chocolate syrups, allowing you to tailor the cake to suit your taste preferences or seasonal occasions.
The adaptability of poke cakes also makes them perfect for experimentation. You can swap out ingredients, try different cake mixes, or add unique toppings to craft a personalized dessert. Whether you’re looking for a summer treat or a festive holiday cake, poke cakes can easily be modified to fit the theme.
Ingredients Breakdown
Creating a Butterfinger Poke Cake involves a blend of simple yet essential ingredients that come together to deliver a rich and satisfying dessert. Let’s take a closer look at these ingredients and their significance in crafting the perfect poke cake.
Essential Ingredients for Butterfinger Poke Cake
1. Yellow Cake Mix: The foundation of our Butterfinger Poke Cake starts with a classic yellow cake mix. This pre-made mix simplifies the baking process and provides a light, fluffy base that pairs beautifully with our toppings. The subtle flavor of yellow cake complements the rich chocolate and caramel elements, ensuring a balanced taste.
2. Sweetened Condensed Milk: This ingredient is essential for adding moisture and sweetness to the cake. After baking, the sweetened condensed milk is poured over the poke holes, soaking into the cake and enhancing its flavor. It gives the poke cake its signature richness and creates a delightful texture.
3. Chocolate Syrup: Chocolate syrup not only enhances the chocolate flavor of the cake but also contributes to the poke effect. When poured into the holes, it seeps deep into the cake, creating pockets of gooey chocolate goodness that elevate each bite.
4. Whipped Topping: To finish off our Butterfinger Poke Cake, whipped topping provides a creamy, luscious layer. It adds a lightness to the dessert and balances the denser elements, making each slice feel indulgent yet airy.
5. Butterfinger Candy Bars: The star of our recipe, Butterfinger candy bars, add a delightful crunch and rich peanut butter flavor that ties the whole dessert together. Their crumbled texture contrasts beautifully with the softness of the cake, creating a multi-layered experience with every bite.
6. Optional Ingredient – Caramel Syrup: For those looking to enhance the caramel flavor profile, caramel syrup can be drizzled over the cake before serving. This optional ingredient adds an extra layer of sweetness and richness, making the Butterfinger Poke Cake even more indulgent.
Step-by-Step Instructions
Preparing the Cake
Now that we’ve covered the essential ingredients, it’s time to dive into the step-by-step process of making Butterfinger Poke Cake. Follow these instructions to ensure a delicious result.
Preheating the Oven and Preparing the Baking Dish
Before diving into mixing the ingredients, begin by preheating your oven to 350°F (175°C). This is a crucial step that ensures your cake will bake evenly and rise properly. While the oven heats up, prepare a 9×13 inch baking dish by greasing it lightly with cooking spray or butter. This will prevent the cake from sticking to the pan, making it easier to remove once it’s baked.
Mixing the Cake Batter
1. Combine the Ingredients: In a large mixing bowl, combine the yellow cake mix, eggs, water, and oil as per the instructions on the cake mix box. If you’re feeling adventurous, consider adding a teaspoon of vanilla extract to enhance the flavor.
2. Blend Until Smooth: Using an electric mixer or a whisk, mix the ingredients on medium speed until smooth and well combined. Aim for a consistency that is free of lumps; this typically takes about 2-3 minutes of mixing.
3. Pour into the Baking Dish: Once the batter is well-mixed, pour it into the prepared baking dish. Use a spatula to spread it evenly, ensuring that the batter reaches all corners of the dish.
4. Bake the Cake: Place the baking dish in the preheated oven and bake for 25-30 minutes, or until a toothpick inserted into the center comes out clean. Keep an eye on the baking time, as ovens can vary.
5. Cool the Cake: Once baked, remove the cake from the oven and allow it to cool in the pan for about 10-15 minutes. After cooling slightly, use a fork or the handle of a wooden spoon to poke holes all over the surface of the cake. Make sure to create enough holes for the syrup to seep in, but be careful not to poke too deeply.
With these initial steps, you’re well on your way to creating a delectable Butterfinger Poke Cake. In the next part of this article, we will continue with the remaining steps, including the delicious filling and topping that make this cake irresistible. Stay tuned for the mouthwatering details to come!
Baking Time and Checking for Doneness
Once you have poured your batter into the prepared cake pan, it’s time to bake. Place the cake in a preheated oven at 350°F (175°C) and bake for approximately 30-35 minutes. To check for doneness, insert a toothpick into the center of the cake. If it comes out clean or with a few moist crumbs (not wet batter), your cake is done. Remember, baking times can vary based on oven calibration, so it’s essential to keep an eye on your cake in the last few minutes. Avoid opening the oven door too soon, as this can cause the cake to sink.
Creating the Poke Effect
The “poke” in Butterfinger Poke Cake is what makes this dessert uniquely delightful. To achieve this effect without damaging the cake, use a long wooden skewer or a drinking straw. After the cake has cooled for about 15 minutes, gently poke holes in the cake at approximately one-inch intervals. Aim for even distribution across the surface, but don’t poke all the way to the bottom—just deep enough to allow for the chocolate mixture to seep in.
Explanation of How the Chocolate Mixture Seeps into the Cake and Enhances Flavor
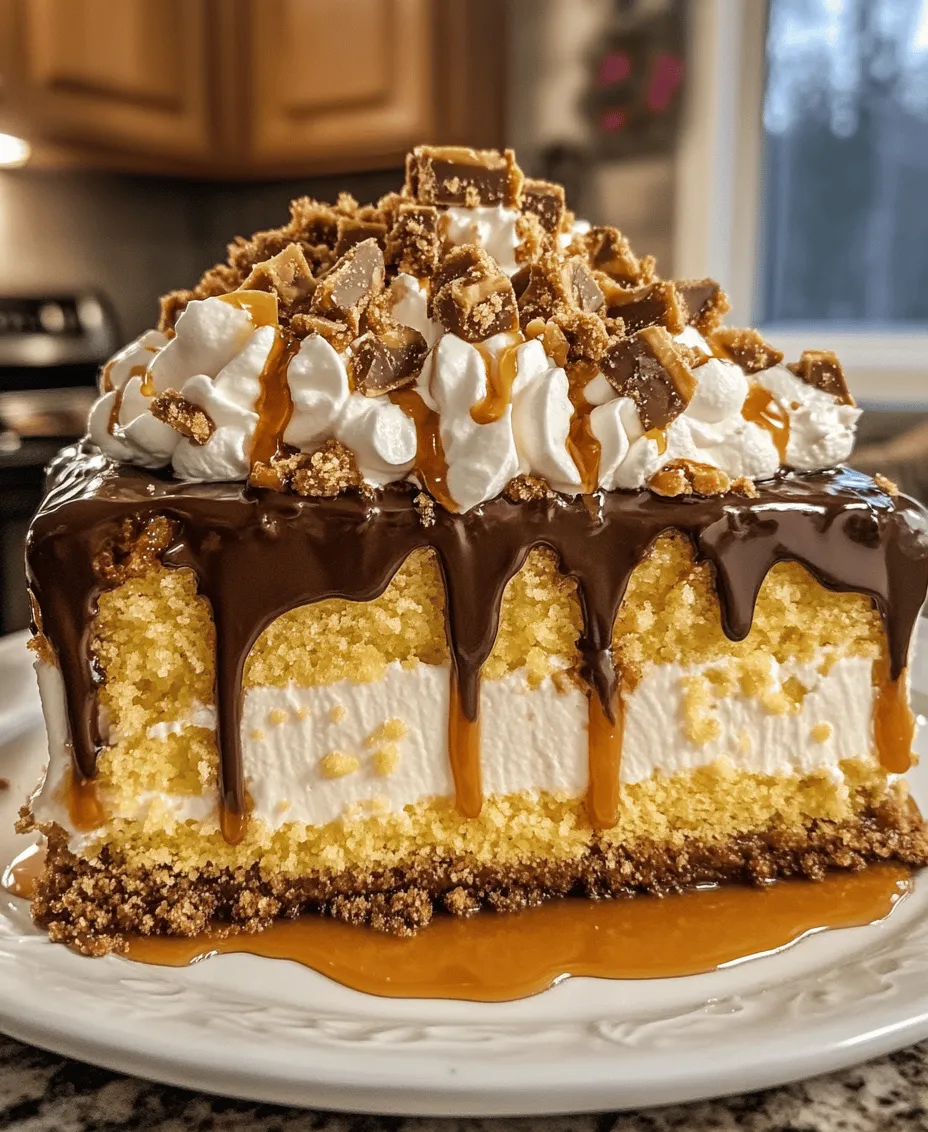
Once the holes are poked, the next step is to prepare your rich chocolate mixture. This usually consists of chocolate pudding or a chocolate syrup. As you pour this mixture over the cake, it seeps into the holes, infusing the cake with a decadent chocolate flavor. The result is a moist and flavorful cake that offers an explosion of chocolate with every bite, perfectly complemented by the creamy topping and crunchy Butterfinger pieces.
Assembling the Cake
Pouring the Chocolate Mixture Over the Cake
After poking the cake, pour the chocolate mixture evenly over the surface. Start at one end of the cake and allow the mixture to flow over the top, ensuring that it fills each hole. The goal is to saturate the cake without overwhelming it. Using a spatula, gently spread the mixture to encourage even distribution if necessary. Allow the cake to rest for about 10-15 minutes, giving it time to absorb the chocolate goodness.
Tips for Spreading the Whipped Topping Evenly
Once the chocolate mixture has settled, it’s time to add the whipped topping. You can make homemade whipped cream or use store-bought. If you’re opting for homemade, whip heavy cream with powdered sugar until stiff peaks form. To spread the whipped topping evenly, dollop it across the surface of the cake and gently spread it outwards using a spatula or the back of a spoon. Be careful not to disturb the chocolate layer beneath. A gentle hand will ensure you maintain the beautiful layers of chocolate and cream.
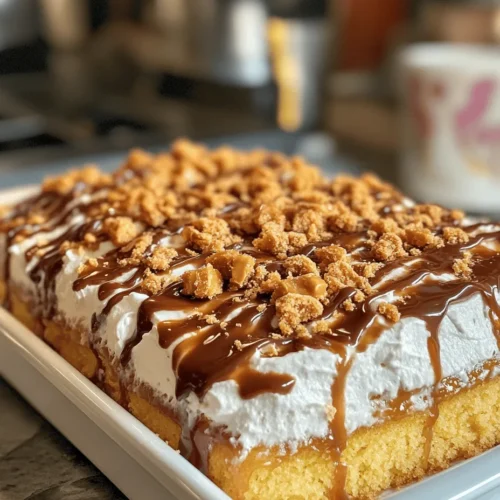
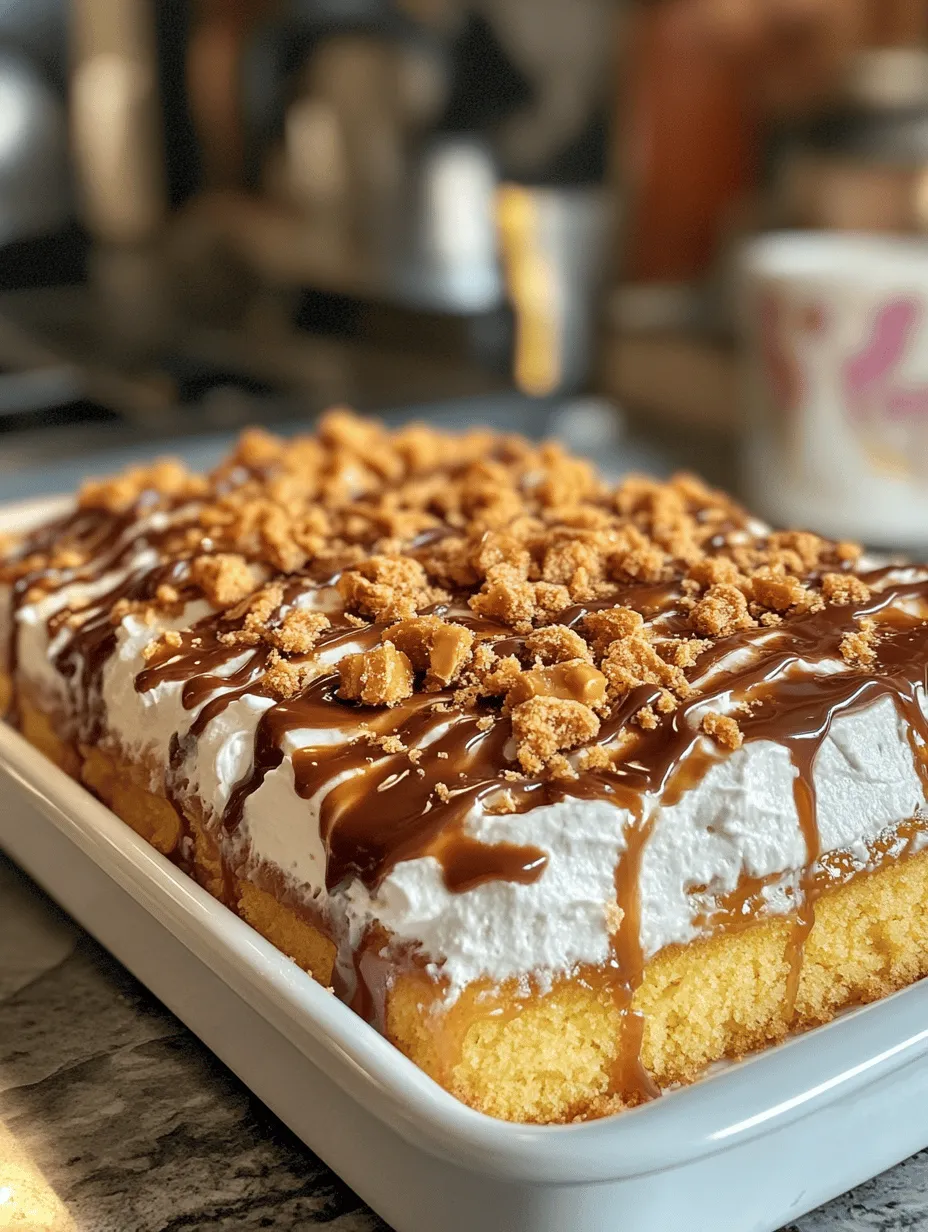
Adding the Finishing Touch with Crushed Butterfinger Bars and Optional Caramel Drizzle
The final step in assembling your Butterfinger Poke Cake is to add the finishing touches. Sprinkle crushed Butterfinger bars generously over the whipped topping, ensuring that every slice will have a delightful crunch. For an extra layer of decadence, consider drizzling caramel sauce over the top. The sweetness of the caramel pairs beautifully with the chocolate and adds another texture to the cake. You can also save some crushed Butterfinger for garnishing each slice when serving.
Chilling and Serving
Importance of Refrigeration for Flavor Melting
Once your cake is fully assembled, it’s crucial to refrigerate it for at least 2 hours, but preferably overnight. Chilling allows the flavors to meld together beautifully, enhancing the overall taste of the cake. The chocolate mixture continues to infuse into the cake, while the whipped topping firms up, providing a creamy texture that complements the other ingredients.
Suggested Serving Methods: Presentation Ideas and Garnishing
When it’s time to serve, you can cut the Butterfinger Poke Cake into squares or slices. For a beautiful presentation, serve each piece on a dessert plate and garnish with additional crushed Butterfinger on top. A dollop of whipped cream can also elevate the visual appeal and add an extra touch of indulgence. Consider pairing the cake with a scoop of vanilla ice cream for an indulgent dessert experience.
Flavor Profile and Texture
Description of the Cake’s Taste: The Balance of Chocolate and Caramel
The Butterfinger Poke Cake is a symphony of flavors. The chocolate layer is rich and velvety, while the whipped topping adds a lightness that balances the dessert. The crushed Butterfinger bars introduce a nutty, caramel flavor that rounds out the chocolate beautifully. This cake encapsulates the essence of a classic chocolate dessert while incorporating the beloved flavors of Butterfinger candy.
Textural Contrasts: The Softness of the Cake, the Creaminess of the Topping, and the Crunch of the Butterfinger Pieces
The textural contrasts in this cake are nothing short of delightful. The soft, moist cake base provides a perfect foundation, while the creamy whipped topping offers a light, airy contrast. The crunchy Butterfinger pieces add a satisfying crunch that plays beautifully against the softness of the cake and cream. Each bite delivers a harmonious blend of flavors and textures that will leave your guests coming back for more.
Ideas for Pairing with Beverages or Other Desserts
This Butterfinger Poke Cake pairs well with a variety of beverages. A cold glass of milk is a classic choice that complements the rich chocolate flavor. For adults, consider serving it with a cup of coffee or a dessert wine, which can enhance the chocolate notes. If you’re feeling adventurous, an iced caramel macchiato or a vanilla latte can also provide a lovely flavor pairing with the cake. For a complete dessert spread, consider serving it alongside chocolate mousse or brownies for a chocolate lover’s dream.
Variations and Customization
Alternative Candy Bar Options for Different Flavor Profiles
While Butterfinger bars are a delicious choice, don’t hesitate to experiment with other candy bars to customize your poke cake. Snickers, Milky Way, or even Reese’s Peanut Butter Cups can add unique flavors and textures to your cake. Each candy bar will bring its distinct taste, allowing you to create variations that suit different preferences.
Suggestions for Homemade Whipped Topping vs. Store-Bought
Homemade whipped topping tends to be fresher and free from preservatives, making it a fantastic option if you have the time. To make it, simply whip heavy cream with a bit of powdered sugar and vanilla extract until you reach stiff peaks. However, if you’re short on time, store-bought whipped topping is an excellent convenience option that can save you effort without sacrificing flavor.
Gluten-Free and Dairy-Free Adaptations
For those with dietary restrictions, you can easily adapt this recipe. Use gluten-free cake mix and ensure that your pudding mix is also gluten-free. For a dairy-free version, consider substituting the whipped topping with coconut whipped cream and using almond milk or a dairy-free pudding mix. These adjustments allow everyone to enjoy this delightful dessert without compromising on taste.
Conclusion
In summary, the Butterfinger Poke Cake is a delightful crowd-pleaser that combines rich chocolate, creamy whipped topping, and crunchy Butterfinger pieces into a harmonious dessert. Perfect for birthdays, potlucks, or any gathering, its ease of preparation and impressive visual appeal will surely impress your guests. We encourage you to try this recipe and let your creativity shine by experimenting with different flavors and toppings. Baking is not just about creating delicious desserts; it’s about sharing joy and love with friends and family. So gather your ingredients, preheat your oven, and embark on a delicious adventure with this Butterfinger Poke Cake that everyone will love.